Posted on 9 Comments

Bertello Pizza Oven Review (With Recipes and Photos)

Bertello pizza oven review, wood fired pizza oven

I am a big pizza fan!  I mean, who isn’t?! Growing up on the east coast,  pizza was a big part of life.  After moving to the west coast,  it’s been tough finding good pizza.  My in-laws recently gifted us a Bertello pizza oven, and it’s been a wonderful experience. This post will focus on an in-depth Bertello pizza oven review, a step-by-step guide on how to use the pizza oven, followed by some yummy pizza recipes

Wood fired Margherita Pizza


Bertello Pizza Oven Review

Why choose a pizza oven for your home?

You have a conventional oven; why do you need a wood-fired pizza oven? 

Pizza ovens get significantly hotter than your conventional oven (upwards of 800 degrees). This leads to cooking pizzas so fast! Wood-fired ovens work by trapping heal within the walls of the oven. It is also a very traditional way of making pizza. 

If you want NY-style pizza, you have to replicate how they cook their pizza. Granted, you won’t have the New York water to get the distinct flavor, but it will still be very delicious! Definitely better than anything you make in the regular oven. 

The wood-fried aspect really gives the pizza a deeper flavor.  

pizza oven and wood fired pizza

What is the Bertello Pizza Oven?

Featured on Shark Tank,  this oven is a good budget option at the $300 range.  We came across it when we were doing our Amazon wedding registry, and it had great reviews. You can get it on Amazon.

Created by entrepreneur brothers, Andy and Eric Bert, the mini outdoor oven is portable. It is also a hybrid model, meaning you can use wood as fuel or propane. The pizza oven can go past 900F and produces authentic Neopolitan pizzas in under 2 minutes. 

If you use propane, you’ll need to purchase a propane tank and gas attachment.  We did not go the propane route, and our pizzas still cook beautifully and taste amazing!

The oven itself is on the smaller side and works well if you don’t have a lot of space. We have a small balcony, and the oven fits perfectly there. It’s nice to have the pizza oven experience without having to spend a huge amount of money and need a giant backyard. 

Bertello pizza oven review, wood fired pizza oven

Getting Started with the Bertello Pizza Oven 

There is definitely a learning curve to using this oven,  so be sure to do your research before starting.  My husband and I were too excited, and we did minimal research, which consisted of reading amazon reviews and watching some YouTube videos.  

Unboxing the Oven:

The oven is very easy to put together.  It is heavy, so I definitely appreciated that my husband put it together. 

The instructions helped with getting the oven together. But it was not helpful in providing a step-by-step guide of how to use the Bertello pizza oven. Through trial and error,  we have figured out a system that works for us now. 

The Bartello oven comes with the following:

  • Pizza stone
  • Wood/Charcoal/Fuel Tray
  • Tongs
  • Pizza peel
  • Scoop for wood chips/pellets

Detailed Bertello Oven Pizza Review

Attempt #1:

Our first attempt at the oven was late on a Friday evening. We were very excited to try it out. However, I don’t suggest doing this at night. It’s easier to see what you are doing during the daytime. When you get better at using the oven, you can use it at night if you like. 

For fuel, we bought the following from Home Depot:

We loaded 6-7 charcoal briquettes into the back slot and lit them in the fire with tumbleweed as a starter. We saw in a YouTube video that you should light the coal and leave it for about an hour until it turns white.  After this,  you add wood and pellets to get the fire going.  

Our first attempt was disastrous. Our fire was nowhere near what it should have been, and the pizza stone was not heating up properly. We stupidly put the pizza in, and it stuck to the bottom.  It was a disaster!

We also had a lot of trouble trying to get the pizza off of the peel and into the oven.  It would stick and clump together. 

We ended up with 1 pizza that was semi-edible.  But overall, this was a FAIL!

Attempt #2

We played around with the fire to get it roaring. We were able to build it up but ran into similar issues of the oven not heating towards the front end.  This would lead to the pizza sticking and being impossible to turn.  We ended up with a couple of “calzones.” 

We watched the video from the creator, who did help a bit with arranging the pizza.  We were loading our pizza with too much sauce and cheese.  You really have to go minimalistic with toppings. 

Attempt #3

My husband was ready to call it quits at this point.  We didn’t understand how it was so easy for others, but we were having so much trouble. O

Was it not using propane? Or should we get a temperature gun? Our Bertello oven review wasn’t looking so great thus far. But, we didn’t want to give up either. Other people had such great photos and enjoyed their oven. 

We had to figure out what we were doing wrong. 

Finally, after an hour of scouring the internet, we happened upon this gem of a video. 

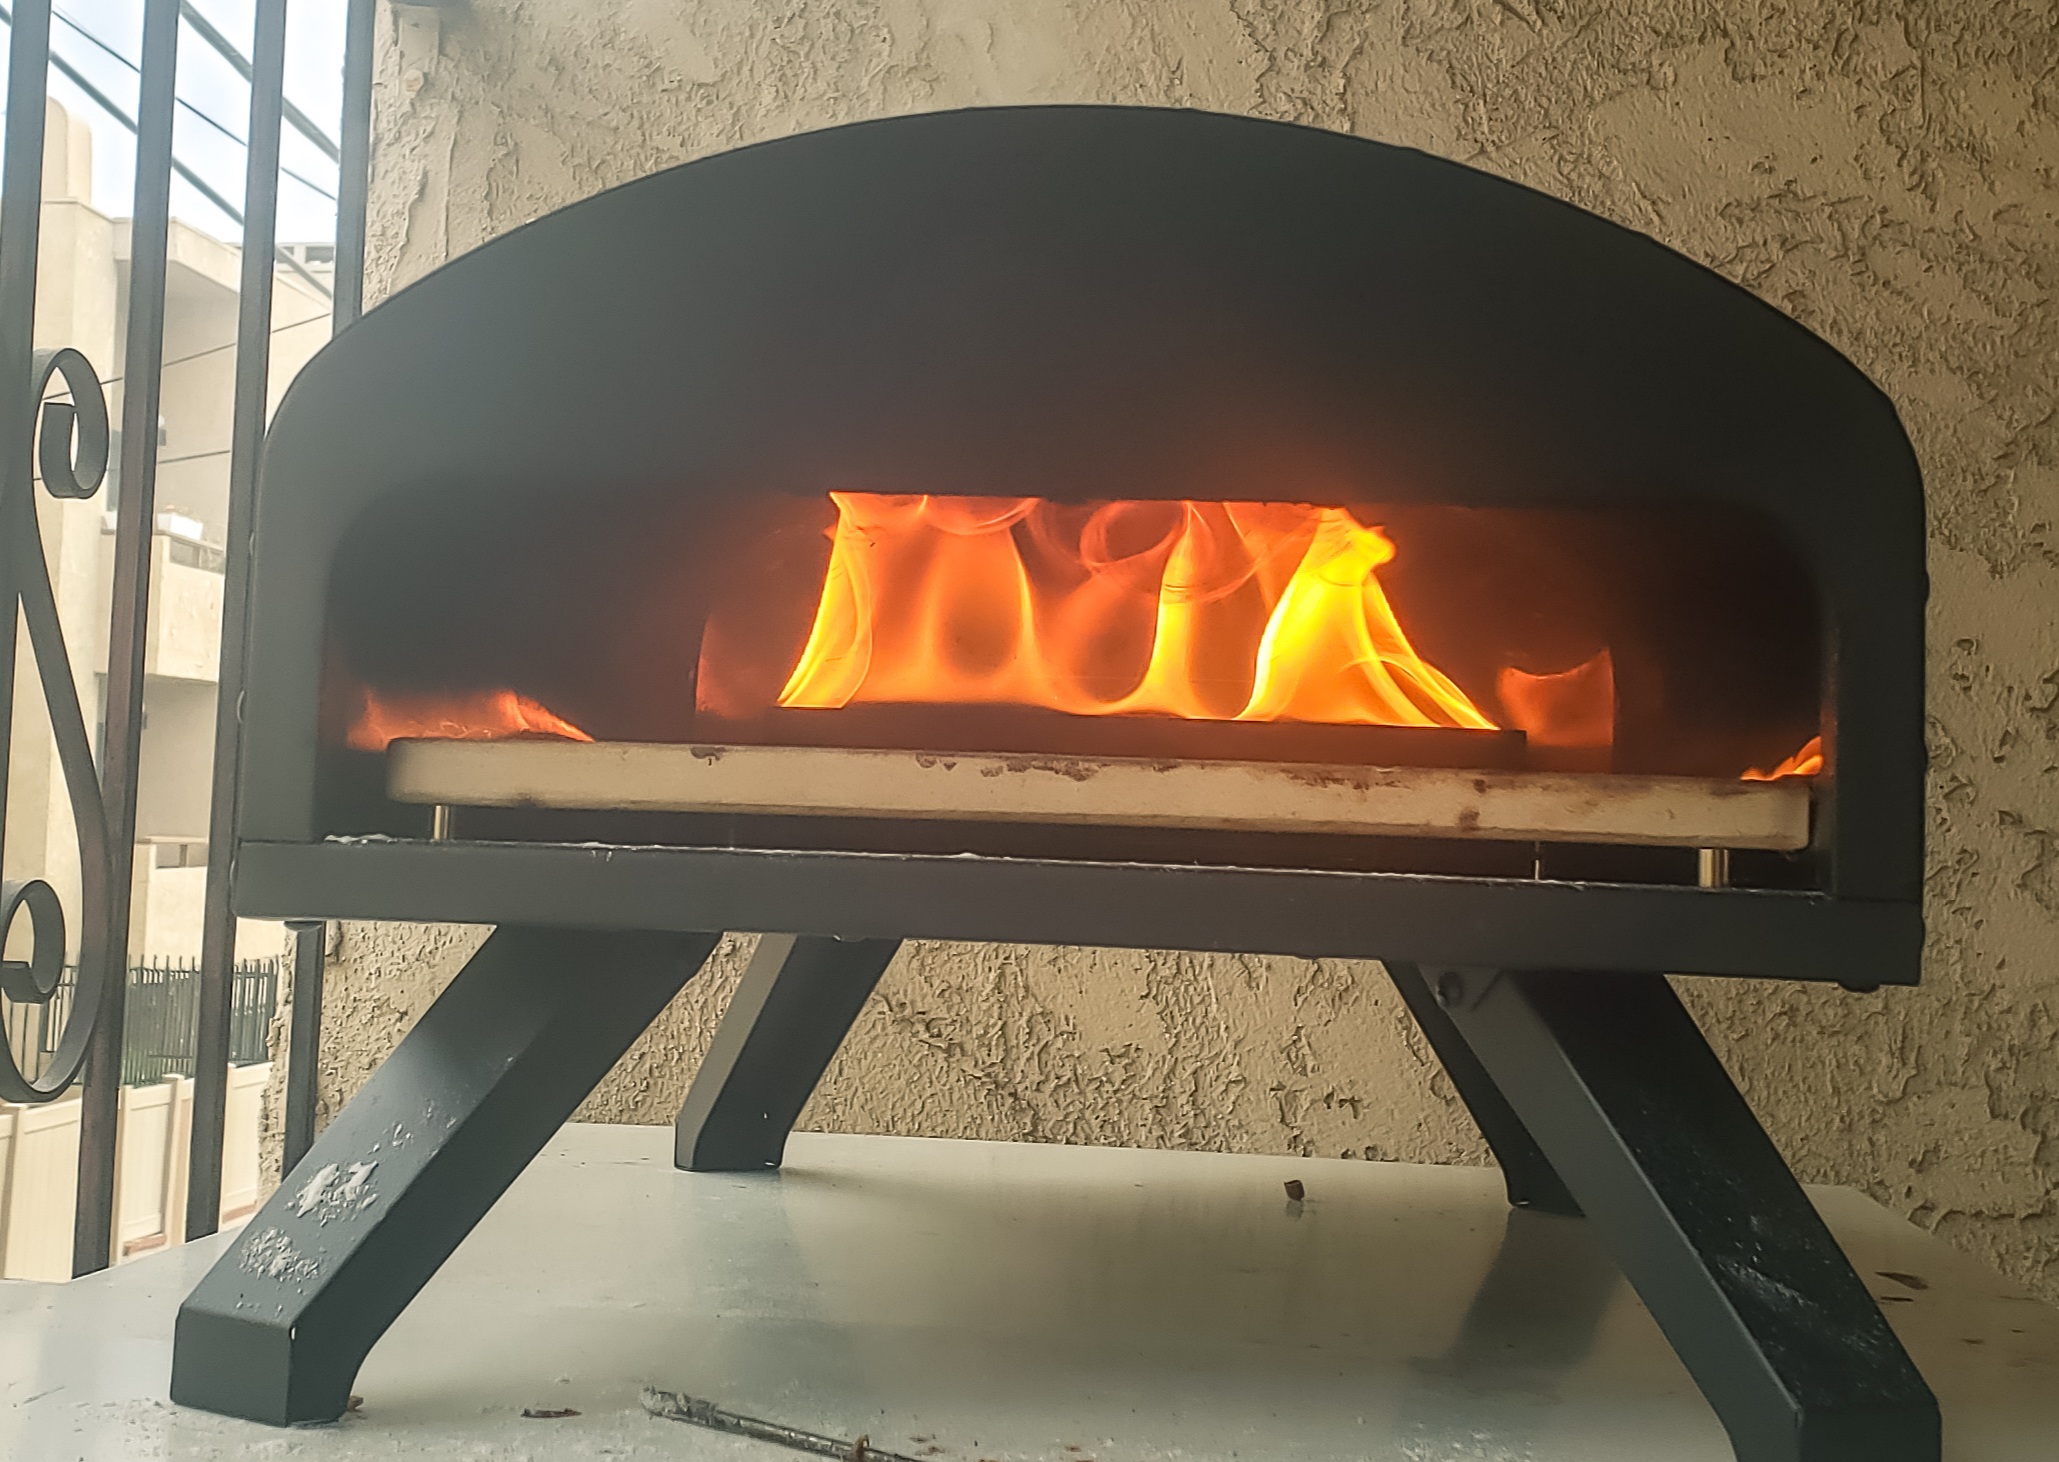
We saw that for the oven to really work,  the flames have to hit the roof of the oven and almost come out the front. Watch the video, and you’ll see epic flames.

We had a baby fire going and thought that would be enough.  A lightbulb went off, and we decided to try again, this time armed with knowledge.  

Here is the exact process we used.  Follow this, and you’ll have amazing wood-fired pizzas in no time!

How to Use the Bertello Pizza Oven (With Pictures)

1.) Situate the oven onto a stable table. We use two end tables and it works great. Add 4-5 charcoal briquettes to the fuel tray. Place tumbleweed in the center to create a pyramid. Light on fire and close the door cover. Let it do its thing for 30 min to an hour until the coals turn white. 

Pizza oven tray with coal bricks and tumbleweed

How to light fire in pizza oven

2.) In the meantime,  prep your pizza dough and toppings. I used this recipe from Bobby Flay, which turned out beautifully. Due to the size of the oven, we stuck to smaller personal sizes. You can make 6 pizzas with the Bobby Flay recipe. 8-10 inches is a good size for this oven. 

3.) When rolling out your pizza dough,  use a generous amount of flour, so it doesn’t stick. I like to use this silicone mat as it has convenient templates for pizzas by inch so you can roll to the correct size.  Sprinkle flour onto your pizza peel, and transfer rolled dough to it. I used all-purpose flour. You want enough so the dough doesn’t stick. 

4.) Add a 1-2 spoonfuls of sauce.  It doesn’t sound like much,  but that’s really all you need.  Add your toppings, don’t overdo it. Keep it light.  

Uncooked four cheese pizza on pizza peel

5.) Check the oven to see if it’s ready.  When the coals are white,  add your wood chunks and/or pellets.  We use half a cup to a cup of hickory pellets.  Wait until the fire is roaring. This will take a couple of minutes. You can use a fan blowing towards the back tray door to help it along.  You can also use a temperature gun to check the temp,  but we don’t. If you do use a temp gun, you’ll want the back to be around 800F and the front higher than 500F. 

Wood fired pizza oven, roaring flames, bartello pizza oven

6.) When it’s ready, and the flames are hitting the top roof,  slide your pizza in. You want to aim for the middle of the oven. We have had success when it’s been more towards the front, but this is volatile as it’ll depend on how hot the front of the stone is. If your fire is really roaring, you’ll be able to do this. 

7.) At this point, you’ll need to watch to check when to turn your pizza.  Sometimes we’ve turned it in every 20 seconds, and other times every 5 seconds.  You’ll know to turn when cheese is bubbling.  Turn 4 times, so it cooks evenly.  Be patient, as this process can take some time to maneuver. Depending on how hot the oven is, sometimes burns will happen. It’s trial and error and with repeated use,  you will become a pro. 

8.) Your pizza should be done in a minute or two! We try to have a backup pizza ready to go so we can put it in just as the first is finishing. The fire should last 1-3 pizzas before you need to refuel.

Wood fired Margherita Pizza

9.) Refueling is easy. Just add more wood or pellets. 

Notes:

There are certain tools that can help you with the process of making pizzas in the oven—a temperature gun and turning peel.

Using this oven is definitely a two-person job.  You probably could do it with one person,  but it might be stressful. More helpers speed up the process.

Making your own pizza at home can be a process,  but we really enjoy it now that we know what we’re doing.  Our final Bertello oven review is that it is a fun thing to have.  Our oven gets a lot of use in our home, and we do weekly lunch dates with friends to use it.  Everyone loves it! It’s a great activity to do with the company. 

Plus the pizza tastes amazing!

Here are some of our favorite recipes:

White Four-Cheese Garlic Pizza Recipe

Wood fired white four cheese pizza with garlic and olive oil

Ingredients:

Homemade or store-bought pizza dough

1 tbsp Olive oil

Mozzarella cheese sliced

Ricotta cheese

Shaved Parmesan

Grated Romano

1 clove Garlic sliced

Directions: 

1.) Roll pizza dough to 8-10 inches

2.) Spread 1 tbsp olive oil to coat the top.  

3.) Add garlic slices and top with cheese

4.) Bake in the wood fried oven for 1-2 minutes 


Classic Margherita Pizza Recipe

Wood fired Margherita Pizza

Ingredients: 

Homemade or store-bought pizza dough

1-2 tbsp Pizza sauce

Mozzarella sliced

Chopped basil

Directions:

1.) Roll pizza dough to 8-10 inches

2.) Spread 1-2 tbsp pizza sauce

3.) Top with Mozzarella slices and basil

4.) Cook for 1-2 min in the pizza oven


Spicy Wood Fried Pizza Recipe:

Spicy wood fired pizza recipe

Homemade or store-bought pizza dough

1-2 tbsp Pizza sauce

1 tbsp hot oil

Mozzarella sliced

Romano Grated

Jalapeños slices

Directions:

1.) Roll pizza dough to 8-10 inches

2.) Spread 1 tbsp hot oil

3.) Add 1-2 tbsp pizza sauce

4.) Top with Mozzarella slices and grated Romano. Add Jalapeños.

5.) Cook 1-2 minutes in the pizza oven. 

How to Care for Your Pizza Oven

Now that you’ve made all the yummy pizza in your belly, you’ll need to clean your pizza oven. This is pretty low maintenance. After your oven has completely, remove the fuel tray and discard the ashes. You can use an old towel or paper towels to wipe the inside clean. 

Next, you’ll want to clean your pizza stone. Pizza stones are porous items and you want to refrain from using soap on your stone. This is because the stone will absorb the soap and you’ll pizza will taste like suds. Pizza stones don’t need soap anyway as the heat from the fire will kill bacteria. 800+ degrees is really hot!

To clean your pizza oven: 

  1. Scrub off any food particles. Use either a sponge or a wooden spatula. Don’t use metal as you will damage the surface. 
  2. Using just water, gently scrub the surface. 
  3. If your surface is burnt, mix 50:50 part water with baking soda. Spread the paste and let it sit for 5-10 minutes. Wash away with water and repeat as needed. 
  4. If your pizza oven is severely caked, you can put it in a conventional oven at 500F. Place the stone on the top rack right when you turn the oven on. Do not put the stone into a hot oven, it needs to rise in temperature slowly. Leave in for about an hour. After the oven and stone have cooled, remove and scrub off burnt bits.
  5. After you’ve cleaned the pizza stone, return it back to the oven. We store our oven outside on our balcony.

I hope you enjoyed this Bertello Pizza Oven Review.  Did you try any of these recipes? Comment below!

Subscribe to the newsletter to keep updated on blog posts. Follow me on Instagram @by.bindi. 

Did you eat too much pizza? Check out 11 Ways to Lose Weight and Keep it Off

Posted on 6 Comments

DIY Lavender Vanilla Lip Balm Sticks (Non-Toxic Recipe)

homemade lavender vanilla lip balm recipe with essential oils

Do you have chapped lips and are you constantly applying chapstick? It always seems like the more you apply the drier they become right? This DIY Lavender Vanilla Lip Balm recipe is super nourishing and will keep your lips soft for a long time. 

I notoriously have cracked and dry lips. I don’t always treat my lips well as I’m horrible at picking at them all the time (I know, it’s a terrible habit)!  That combined with weather tends to leave my puckers in bad shape. 

I’ve used every chapstick and lip balm under the sun. Some work but many times they leave me wanting more.  

Ever since I switched to non-toxic living and ditched my chemical-laden beauty products,  I’ve been really into making my own products at home. I never made lip balm before so I decided to solve my chapped lip problem and have some fun in the process!

This homemade lip balm recipe with essential oils is super cost-effective,  all-natural, and nourishes your lips so well. I don’t have to reapply every hour! The lavender and vanilla combo is a heavenly bonus!

DIY Lavender Vanilla Lip Balm Sticks

Why Make Your Own Lip Balm at Home?

diy lavender vanilla lip balm recipe (non toxic)

With homemade lip balm, you know exactly what you’re putting in it.  You control the ingredients and therefore can know with certainty you are using the best ingredients for your body.  Your body is worth taking care of in a chemical-free way.  Especially with our lips. You don’t want to ingest something that can build up in your body and cause problems down the road. 

Making lip balm at home is also a fun project! I made mine with my husband during our weekly self-care Sunday evenings.  We had a blast making them! You can make these lip balms with kids (with supervision) or with friends. I highly suggest making these with people as it’s a great activity and everyone will enjoy it. 

Homemade lip balm tubes also make lovely gifts! Slap on a cute label and they’re ready to be gifted. 

Will This Recipe Help Chapped Lips?

chapped lips

Yes! This recipe uses a combination of high-quality natural oils and butters that come together to moisturize your lips deeply. Ever since I made this recipe, I’ve been obsessed and my lips are so silky soft! The first night I made them, my lips were moisturized when I woke up the next morning and I didn’t need to reapply until hours later! This also adds to the cost-effective side as you won’t go through it often. 

Although, I like applying it so I still do even though I don’t need to! 

The powerful natural ingredients nourish and hydrate your lips so you’ll have soft, smooth, and kissable lips all the time. Most recipes call for one or two butters and oils. I used a mix of two kinds of butter and four oils to maximize the benefits for our skin. 

Beeswax: 

beeswax pellets, yellow

Beeswax is a natural wax produced by honey bees. It is edible and non-toxic, thus making it a great ingredient for skincare and clean beauty products. 

This wax is great at creating a protective layer and trapping moisture as it’s a humectant. This combination makes beeswax a perfect ingredient in lip balm recipes. 

Shea butter:

shea butter

Shea butter is a fat derived from nuts. It comes from the African Shea tree. This butter is a very popular ingredient in body butters as it’s incredibly nourishing. 

It is very thick and can be greasy if used on its own. When combined with other butters and oils, it provides incredible moisturizing properties. Shea butter is also edible and non-toxic. 

And, even though this butter comes from a nut, it has a low chance of triggering nut allergies

Cocoa Butter:

cocoa butter

Cocoa butter is the fat that comes from the cocoa bean. This butter has a rich chocolatey smell (yum!). Cocoa butter isn’t just something that is used in chocolates. It also is great at creating a barrier on the skin to keep it from drying out. 

This butter can also help protect our skin from sun damage. Cocoa butter is also filled with antioxidants which is great for anti-aging products. 

Coconut Oil: 

coconut oil

Coconut oil is one of the most popular ingredients in DIY beauty recipes. This oil provides so many great benefits for our skin. It protects skin from environmental damage, hydrates, and can minimize fine lines and wrinkles. 

Also, because it absorbs easily, it won’t leave a greasy feeling on your skin. Coconut oil does have a high comedogenic rating (4). I use fractionated coconut oil which has a comedogenic rating of 2. 

Sweet Almond Oil: 

Sweet almond oil is such a powerhouse. It not only is great at moisturizing, but it also can lighten dark spots. Over time, our lips can lose their vibrant pink color and this oil helps even the tone. 

Jojoba Oil: 

Jojoba oil comes from the jojoba plant. This oil is also phenomenal at locking in moisture and has anti-aging properties. It absorbs quickly and does not leave behind a greasy residue. 

Vitamin E Oil: 

Vitamin E is a popular anti-aging gold mine. It’s no wonder it’s used in many skincare products. This oil is thicker than others and you only need a little bit to get the job done. Vitamin E oil is perfect for dry and chapped lips as it encourages cell turnover and leads to the skin regenerating faster. 

Lavender essential oil: 

Lavender essential oil is great for healing cracked lips as it’s anti-inflammatory and soothing. It’s a great oil to use during the winter months when the weather destroys our kissable lips. Lavender also is great at locking moisture in and hydrating lips. 

Vanilla Extract:

Organic vanilla extract has many anti-aging benefits. Vanilla extract is more than just a nice scent. It also has anti-bacterial properties which can help heal your lips if they are severely damaged. 

Plus it smells heavenly!

This post contains affiliate links. If you use these links to buy something I may earn a commission. Thanks!

Homemade Lavender Vanilla Lip Balm Recipe 

Ingredients: 

2 tbsp beeswax

1 tbsp African shea butter

1 tbsp Cocoa Butter

1.5 tsp Fractionated Coconut Oil

1.5 tsp Sweet Almond Oil

1.5 tsp Jojoba Oil

.5 tsp Vitamin E Oil

20-30 drops Lavender essential oil

1 tsp VanillaExtract*

Lip Balm Tubes

Double Boiler

*You can substitute vanilla essential oil instead of extract if you want a stronger vanilla scent. If you’re adding the oil, use 10 drops. If you use vanilla extract, your end product may look a little speckled, but it’s not super noticeable. 

Notes: 

  • When purchasing essential oils, make sure they are pure 100% organic oils that are not cut with any fillers. Personally, I like Plant Therapy and Young Living for essential oils for their high-quality oils. 
  • This lip balm recipe makes about 9 tubes. If you want less, you can half the recipe. 

Directions:

  1. Measure out ingredients.
  2. In a double boiler, add beeswax, shea butter, and cocoa butter.  On low heat, let it melt until it is liquified. 
  3. Remove from heat and add all 4 oils plus lavender and vanilla extract.  If the mixture starts to harden, return to the double boiler to liquefy. The vanilla extract will not mix with the oils, but you can stir to distribute it evenly. 
  4. Fill lip balm tubes with the mixture. Using a funnel helps avoid spillage. 
  5. Let tubes cool before using. 

Makes 9 lip balm sticks.  You can fill with tins instead if you like. 

diy lavender vanilla lip balm, homemade chap stick recipe

This DIY Lavender Vanilla Lip Balm Sticks Recipe is perfect to follow after a natural exfoliating sugar scrub. Try these 5 DIY lip scrub recipes.

Did you make this lip balm recipe? Comment below or tag me on Instagram (@by.bindi). I’d love to see your photos!


Posted on 7 Comments

Powerful Daily Affirmations for Self-Love

powerful daily affirmations for self love

Self-love is something many of us don’t prioritize and it is so important for our esteem, confidence, and mental health. These powerful daily affirmations for self-love will guide you to appreciate who you are. 

We tend to think that putting ourselves first is selfish and it feels weird to give ourselves so much attention. On the contrary, showing ourselves some care is not only needed, we should give it proper attention. 

Because you not only are worth it, you deserve your love and care as much as anyone else. 

This post contains affiliate links. If you use these links to buy something I may earn a commission. Thanks!

Powerful Daily Affirmations for Self-Love

powerful daily affirmations for self love

Why Should You Focus on Self-Love? 

Self-love is not a selfish act. Caring about your needs and putting your happiness first allows you to go through life without being drained. 

Often times we are pulled in many different directions as we try to keep those around us happy. This could lead to negative thoughts we fail and can’t keep up. 

Focusing on self-love and kindness teaches us from an area of positivity. It nurtures our minds and shows us that we will be okay. 

Some benefits that come from practicing self-love are: 

  • increased internal strength
  • decreased stress
  • higher productivity

Sounds awesome right? 

What are Affirmations? 

what are daily affirmations

Daily affirmations are positive statements that are directed towards a specific goal. They help engineer your mind to focus and stay on track through repetition. Repeating affirmations daily trains your brain to believe the statement. 

For example, if you are having trouble with self-confidence, your daily affirmation might be, “I am enough.” 

This simple statement might sound funny to utter at first and maybe you don’t believe it right away. But, with practice and time, you will change your mindset from negative to positive acceptance. 

Say it enough times and it will come true. 

Sounds hokey? There’s science behind why affirmations work. When you visualize what you say, you create a positive image. Your brain starts associating this image as a fact. With repetition, we condition our minds to accept it as truth. 

How to Practice Daily Affirmations

 Your mind will believe whatever you tell it. how to practice affirmations for self love

There is no right or wrong way to practice daily affirmations. Try a couple of different methods and see what feels good for you. It is a very personal experience and you need to feel comfortable. Whichever method you choose, stick with it until you feel the release of your negative feelings. 

Affirmations are great because you can continue to tailor them to your life and goals. As you evolve so will your affirmations. 

Here are some methods for practicing your affirmations: 

  • Say them out loud to yourself while you face a mirror. 
  • Write them down in a journal every morning after you wake up. 
  • Create post-it notes and place them in high-traffic areas where you will see them daily. 
  • For deeper connectivity, use positive affirmations during a meditation session. Close your eyes and visualize the words as you say them either in your mind or out loud. You can pair your meditation with calming music and essential oils to ground your focus and energy. 

Whichever method you choose, stay consistent and keep going even if you feel it isn’t working. Sometimes these things take time to wash away our negative feelings and anxiety. 

Powerful Daily Affirmations for Self Love

self love daily affirmations

“I am Enough”

This one is simple and short, but it gets right to the point. It’s a good one to use when you are feeling mentally drained from life’s obstacles and need a reason to regain your worth. You are enough. Who you are is separate from what life throws your way. 

“I am Worthy”

Often we tie our self-worth to our successes and failures. Our self-worth is independent of those things. We should believe that we are worthy no matter what life throws our way. 

“I am Okay”

Life stress can interfere with our sanity and increase anxiety. Take a breath and know that you are okay. 

“I am Powerful”

Circumstances can beat us down to the point where we feel completely useless. While we cannot change what happens to us, we can change our response to what life puts in our path. We have control of our actions. Saying and believing you are powerful will help you through the tough times. 

“I am Confident”

Here’s a little secret: most people are not confident. Many of us are faking it. The idea is to get comfortable enough where the negative thoughts don’t cloud your thoughts and give you anxiety. Keep telling yourself you can surpass your limitations and nothing will stand in your way. 

“I am Beautiful”

You are perfect the way you are and there is no need to change anything. You don’t have to hide underneath layers of makeup (unless you like makeup) or baggy clothes to hide your figure. Each of us is unique and that is nothing less than beautiful. 

“I am Amazing”

Look at what you have accomplished rather than tearing apart things you have not done. You have done so much and are capable of even more. Revel in your shine. 

“I am Centered”

This one is great for times when our anxiety and worry overpower us. Take a deep breath, close you’re eyes and repeat this affirmation. It works by rewiring your brain to take a beat and slow down your negative thoughts. 

“I deserve my Love”

We tend to focus on everyone around us rather than giving ourselves an ounce of thought. We should be kinder to ourselves and appreciate who we are and how far we have come. The love we so freely give should also come to us as well. 

“I am not my Mistakes”

Our self-esteem can take quite a hit when we fail. It’s important to note that mistakes and failures happen to every single one of us. It does not define who we are, rather just our experience. Who we are comes from how we grow and learn from our mistakes. 

positive vibes for self improvement

Use these daily affirmations for self-love whenever you need some TLC. With repeated use, you will feel more comfortable with yourself and empowered to love yourself exactly as you deserve to be. You are always worth the effort. 

Want more self-love ideas? Check out these self-love quotes and self-care ideas for a happier life. 

Posted on 1 Comment

Striped Crochet Washcloth Pattern (Beginner Friendly)

I absolutely love crocheting bath and spa items. And, adding fun colors to these projects is such a joy! This striped crochet washcloth pattern features a modern minimalist look. They are easy to make and great for beginners and advanced crocheters. 

This crochet pattern comes together very fast. You can whip these babies up in a couple of hours, making these washcloths great for gifting or selling online. This washcloth is perfect for self-care time as it’s super soft. Made from 100% cotton, it is great for sensitive skin. 

I wanted to create a washcloth that had an elegant look without being too much work. I love when projects come together fast and I can get it done while binging my Netflix shows. (Made this one while catching up on Manifest!)

This striped crochet washcloth features 3 colors and 2 stitches: single crochet (sc) and half double crochet (hdc). Stitches crocheted in the back loops create the lovely texture in this washcloth. 

You are welcome to sell any items you make from this pattern and I always appreciate pattern credit.  You are not allowed to sell this pattern as your own. 

Let’s get started!

This post contains affiliate links. If you use these links to buy something I may earn a commission. Thanks!

Striped Crochet Washcloth Pattern

Striped crochet washcloth pattern

Supplies List: 

100% Cotton Yarn (I used white, mint, and dove)

I9 crochet hook

Stitch Markers

Scissors

Needles to weave in ends

Stitches: 

Single crochet (sc): Insert hook into stitch, yarn over, and pull through stitch (2 loops on hook). Yarn over and pull through both loops. 

Half double crochet (hdc): Yarn over, insert hook into stitch, yarn over, pull through 1 loop (3 loops on hook). Yarn over and pull through all loops. 

Pattern Notes: 

  • chain 1 at the beginning of each row does not count as a stitch. Start in the first stitch. 
  • Weave in ends as you change colors. This will make it easy for you so you don’t have to weave everything all at once when you finish. 

Directions: 

Foundation: Chain 34 (Dove yarn)

Crochet foundation chain

Row 1: Hdc in 2nd from hook. Hdc in remaining stitches. Chain 1 and turn. (33 stitches)

How to make crochet washcloth

Row 2: Sc in the back loop of the first stitch. Sc in the back loop until 2nd to the last stitch. Sc in both loops in the last stitch.

Single crochet back loop

Row 3-4: Repeat row 1 and 2

Change Color – Mint

Crochet washcloth Color change

Row 5-8: Repeat row 1-4

Change Color – White

Row 9-12: Repeat row 1-4

Row 13-24: Repeat rows 1-12

Fasten off and weave in ends. 

Striped crochet washcloth

Did you make this pattern? Comment below! Tag @by.bindi on IG. I’d love to see your creations. 

Want more free crochet patterns? Try these crochet face scrubbies or single crochet washcloth

Posted on Leave a comment

New Blog Traffic Analysis: 2 Month Review (Feb-Mar 2021)

We are now into month 2 of this blog! I’m proud of my consistency and growing this site. With 60 days behind me, I wanted to take the time to write up some new blog traffic analysis

Creating this blog has been a long dream in the making. I just tend to get excited at the beginning of new goals and then it fizzes away. So many ideas sit untouched or discarded. This blog is different. So far I’ve made it to 2 months! This is the most consistent I’ve been with any of the blogs I’ve created in the past. I’m really enjoying this process.

New Blog Traffic Analysis: Month 2

I started this blog in January 2021 with my first blog post on Jan 9 (How to Make Reusable Crochet Face Scrubbies in 10 minutes).


I created this blog to comprise everything mind, body, and soul. This is a place for creative tutorials, positive guidance for self-improvement, and healthy DIY recipes. 

After the first-month learning curve, there are things I have done to help build this blog and key learnings I came across to improve my goals. You can take a peek at my 1 month blog review here

Let’s take a look at my month two analytics. 

Things I Have Learned in 2 Months of Blogging

Blog Research

It’s important to stay updated on blog research. I continued to read more about improving on-page SEO and how to create a better user experience. 

blog research with laptop and coffee

Here are some great articles and websites that I found useful this month. 

Answer the Public

I stumbled upon this site recently. This site aggregates what people search for online to help you find keywords for your articles. For example, let’s say my keyword is crochet pattern. I type it into their search box and it gives me different questions such as “How to read a crochet pattern.” I can then use this specific topic for my next blog article as I know people want answers to these questions. This site is super helpful, though you do need to sign up for their premium package if you want more than 3 searches a day. I have not done this yet, but might in the future. 

How to Add Table of Contents to WordPress

As I focus on quality blog posts that are more in depth, adding a table of contents to help users navigate the page has been on my to do list. This article from Hubspot details how to add a table of contents to your WordPress either manually or through plugins. I have not used any plugins on the list, but I will try Easy Table of Contents plugin and see how that works. 

The Definitive Guide to On-Page SEO

This on page SEO guide from Backlinko has 7 chapters that walk you through optimization processes and tips. 

Website Updates: 

In creating a better user experience, I aimed to make sure my site looked clean and was organized properly. I also added social media buttons through Sassy Social Share Word Press plugin to further my blog post marketing. Now it’s super easy for my readers to share my content!

I also added Yoast SEO plugin to improve my keyword optimization. I’m still learning about the best practices, but I do like working at it until the SEO icon turns green! It feels like quite an accomplishment. 

I am considering updating my blog theme to something else next month. I am a little vary of overhauling the blog as I’m worried about errors, but this would be a good time to do it. My blog is still new. 

Month 2 Review

I wrote 7 blog posts my first month. 

In month 2, my goals were to write more posts (at least 11) and to write longer-worded blog posts. I wrote 11 blog posts this month –  I hit my goal! I also kept a consistent publishing goal of one blog post per theme (mind, body, soul) a week so that I would have at least 3 posts within my niche every week. 

These 11 blog posts break down as follows: 

February 15, 2021: Beginner’s Guide to Crocheting: How to Make a Slipknot

February 16, 2021: Easy Beginner’s Crochet Washcloth Pattern

February 18, 2021: 17  Inspirational Self-Love Quotes for Mental Clarity

February 20, 2021: How to Lose Weight and Keep it Off

February 23, 2021: New Blog Traffic Analysis: 1 Month Review

February 24, 2021: How to Make Personalized Vinyl Decals With Cricut

February 25, 2021: Dealing with Long Term Grief

March 2, 2021: Want Long, Thick and Luxurious Hair? Try these Indian recipes

March 4, 2021: How to Single Crochet for Beginners

March 5, 2021: Micro-Goals are the Key to Success

March 9, 2021: Best Natural Acne Remedies that Actually Work

Aside from the 10 days that I took off at the beginning of February for my wedding, I wrote 3-4 posts a week. I took off on the weekends. 

I’ve always had a hard time staying consistent with my goals and I know the #1 reason why new blogs fail is giving up. I want to keep a consistent schedule without being overwhelmed. 

Month 2 New Blog Traffic Analysis

This month, I saw a rise in traffic from my last month’s numbers. This is mainly due to some marketing tactics I undertook.  

blog traffic analysis

The number one reason for the improved traffic is social media and blog engagement groups. I joined a small group on Facebook that helps provide views, comments, and marketing strategies. Because the group is on the smaller side, it is genuine and like-minded individuals. 

If you’re just starting a blog, I suggest looking into these Facebook groups for blog engagement. You will start to receive global views in a short amount of time. It’s a great way to jumpstart traffic to your blog. 

Here is the overview from Jan 9 – Feb 9 (Month 1)

  • 28 first time visitors
  • 270 monthly page views
  • 130 user engagement events

Here are my Month 2 Stats (Feb 9 – March 9)

  • 83 first time visitors – 196% increase 
  • 1.2k monthly page views – 344% increase 
  • 617 user engagement events – 374% increase

It’s exciting to see this upward increase! Baby steps will lead to great things. 

I am trying to get up to a goal of 100 page views per day, or approximately 3,000 page views a month. In my second month of blogging, I’m at 1/3 of my goal. I may be able to reach this milestone hopefully in month 5 or 6.

Page Views and Blog Post Word Counts

Last month, I discussed how  I came across a lot of advice suggesting to write 1,500 to 2,000 words for blog posts. And Neil Patel suggests 2,500 to 3,000 words ! Longer blog posts have a better chance of appearing higher in Google searches because the posts are better optimized and give the user all they need in one place. 

This also increases the time spent on your site!

blog page views

Knowing this information, I went into month two with the mindset of aiming for at least 1k words and 1 post that is over 2k. While not every post met these requirements, I did a pretty good job overall.

Here are the word counts for my 11 blog posts for February 2021: 

Beginner’s Guide to Crocheting: How to Make a Slipknot  (428 words)

Easy Beginner’s Crochet Washcloth Pattern (650 words)

17  Inspirational Self-Love Quotes for Mental Clarity (1,339 words)

How to Lose Weight and Keep it Off (2,484 words)

New Blog Traffic Analysis: 1 Month Review (1,254 words)

How to Make Personalized Vinyl Decals With Cricut (1,114 words)

Dealing with Long Term Grief (1,316 words)

Want Long, Thick and Luxurious Hair? Try these Indian recipes (1,239 words)

How to Single Crochet for Beginners (452 words)

Micro-Goals are the Key to Success (1,044 words)

Best Natural Acne Remedies that Actually Work (1,598 words)


Blog Posts under 1Kwords: 3/11 (27%) | Blog Posts Over 1k words: 7/11 (64%) | Blog Posts Over 2k words: 1/11 (9%)

My most viewed article in month 2 was Want Long, Thick and Luxurious Hair? Try These Indian recipes with 91 monthly views. Previously my most viewed post was 5 DIY Lip Scrubs with Essential Oils with 36 monthly views. 

It will still some time to see how on-page SEO and long-word posts help drive traffic. I believe I should have more data on this after six months of consistent blogging. 

Blog Revenue and Monthly Cost Breakdown

new blog traffic analysis

In month 1 of my blog, I made $0 in revenue. Month 2, I still have not made any revenue. Since this blog is still new, I don’t expect to be able to monetize until 3-6 months. Probably closer to 6 months. 

Here are my monthly costs to run the blog: 

Total for Month 2: $37.98

Overall Total for 2 months: $81.98

I want to keep track of how much I spend each month so once I am able to monetize I have a better picture of where I stand. 

Blog Marketing Breakdown

As I got more comfortable with my blog, I branched out and looked at different ways to market this blog. 

Here are some things I added to my marketing plan: 

  • By Bindi Youtube channel (post videos directly related to blog posts at least once a week)
  • Started using Twitter to promote the blog within writing communities. 
  • Joined a blog engagement group on Facebook. 

My goal for Youtube is to post 1-2 videos a week that directly correlate to my blog posts. Then I can cross-promote these videos within blog posts as well as Pinterest. Plus videos are great additions to my creative tutorials. 

Here are the videos I created in month 2 along with stats. Nothing to rave home about yet. It’ll be interesting to see when/if traffic goes up with this channel. 

31 views

9 views

13 views

20 views

33 views

What’s next for this blog?

Based on month 2 new blog traffic analysis, I have learned some things that I want to implement for month 3. 

Month 3 Goals: 

  • Continue to post 3-4 times a week (Try adding Sunday to the mix)
  • Have minimum 11 posts for the month
  • Stay consistent with marketing on Pinterest, Twitter and Youtube. 
  • Write a 3k word blog post (this may be a reach, but I want to continue to push myself)

I’m excited to see what month 3 has in store for me! Have any tips or guidance for a new blogger? Comment below!

Posted on 4 Comments

Best Natural Acne Remedies for Clear Skin That Actually Work

Best Natural Acne Remedies for Clean Skin

I’ve battled acne since I was 13 years old. My face has seen all kinds of damage over the years and I have the scars to prove it. Through my years of combatting pimples,  I’ve come across the best natural acne remedies for clear skin. With consistent use, they can help improve skin tone and texture too. 

It’s taken me almost two decades of trying everything under the sun.  I’ve had prescriptions such as tretinoin, Accutane, and clindamycin. Over the counter, I tried everything from clean and clear,  Clearasil to chemical  peels,  Proactive, and Murad. 

I don’t even want to know how much money I’ve put into finding an acne treatment that works. 


wasting money on expensive acne treatments

Over time I became more aware of what I was putting in my body and on it and switched to natural, non-toxic products. My skin has been so much clearer and I hardly ever breakout anymore.  Relieving acne naturally is one of the best things you can do for your skin. 

Best  Natural  Acne Remedies for Clear Skin That Work 

What causes acne?

Before we can look at treating pimples naturally, we need to know and understand how and why acne is caused. Acne occurs when the pores in your skin get blocked due to debris, excessive oil, bacteria, and dead skin. Your skin produces sebum, an oil, to lubricate the skin. The sebum comes out of your pores. If there are bacteria and clogging in the pores, your skin reacts adversely. 

Pimples are your body’s response to the build-up in your pores. 

how does acne form, what causes acne

Different types of acne:

As if it wasn’t difficult enough that we have to deal with breakouts, acne occurs in a couple of different forms. 

  • Whiteheads
  • Blackheads
  • Nodules
  • Cystic

Why Natural Acne Treatments?

When I was younger,  my mom always told me to watch my diet and use natural products on my skin.  I didn’t listen. I didn’t think it mattered and focused my energy on chemical-laden products that  I thought were superior. 

As the popular saying goes, “You are what you eat.” This is so true. Feed your body a poor diet of junk food and sugar and your skin will dearly pay for it. You are also what you put on or in your skin. 

Many chemicals in acne products have awful side effects.  Accutane is some heavy stuff and while I managed to escape with minor side effects, others were not so lucky. 

Natural products work with your body and not against it. They nourish it and provide the essentials it needs.  Yes, hormonal and puberty acne is super difficult to control.  

natural products to combat acne

However, with gentle care and consistency, you can control it as I did.  

Combat Acne with a Consistent Skincare Regimen

When you have acne, you want to fix it right away and get rid of it within hours.  I’ve been there I know the anguish of cystic acne exploding over your face before a date or work presentation.

Most acne treatments fail because we tend to switch products too quickly, use too much or too many products when dealing with acne. 

The best natural acne remedy is to pick one regimen and let it do its thing.  Stick with it even if you don’t think it’s working.  Things take time to improve. It can take at least a month to 3 months to see changes in your skin. This is because you have to wait for your skin layers to turnover/shed to start seeing a difference. 

Once I simplified my acne treatment routine and stayed consistent, my skin returned to normal.  

Best Natural Acne Products and DIY Recipes for Clear Skin

This post contains affiliate links. If you use these links to buy something I may earn a commission. Thanks!

Aztec Healing Clay

My sister introduced me to Aztec healing clay and it was a game-changer. It made my skin so soft after one use and the notorious pulsing feels weird at first,  but I’m addicted to it. And, this product is insanely popular because it works. 

Don’t believe it? Check out the 43k plus reviews Aztec healing clay has on Amazon

Aztec healing clay mask for acne treatment, natural skincare product

How to Make a Face Mask with Aztec Healing Clay: 

Mix 1-2 tbsp of Aztec Healing clay powder with enough apple cider vinegar to form a paste consistency. Make sure it isn’t too runny or thick. You can also use water to mix with the powder, but I find vinegar is better. It also is great for helping treat acne!

The mixture will bubble. I like to add a drop of tea tree oil and lemon essential oil for extra healing power.  Plus it smells nice! Make sure to mix ingredients in a non-metal bowl.  I like to use this mask bowl and spoon. Plus it’s so cute!

Apply to face and wait 15-20 min. If you have sensitive skin,  you might want to wash it off sooner. After 5 minutes or so you will feel your skin pulsing. This is normal and don’t get scared!

When you wash it off, your face will be red.  Make sure to properly moisturize. Your skin will return to normal within a couple of hours.  

How often to Use this Clay Mask?

Use once a week for best results.  Don’t use it too often or you’ll over dry your skin. 

Exfoliating Cinnamon Honey Mask

This nontoxic face mask recipe is a relatively recent addition to my routine and it’s amazing!  I love that it’s easy to make and made of all-natural ingredients. Plus it is cheap! Win-win.  

exfoliating cinnamon and honey mask for acne treatment

Why this Mask Works:

Cinnamon:

Cinnamon can shrink pores and reveal softer and smoother skin. This is perfect for those such as myself who have uneven skin tone from acne scarring. It’s also anti-bacterial which helps in combatting the bacteria that cause pimples. 

The granules from the powder also help exfoliate the skin when you wash it off. 

Cinnamon is considered a “hot” spice. Make sure to test for any reactions first and always wash thoroughly if you feel as if it is too much for your skin. 

Honey:

Honey is an ancient skin remedy that was readily used by the Egyptians. This sweet food is more than just an addition to your morning tea. This potent ingredient is anti-bacterial and can help eliminate excess oil from your skin. This helps to keep pores clean. Also, it’s gentle and won’t irritate your skin. 

Nutmeg: 

Nutmeg is great for improving hyperpigmentation and discoloration that is left behind by acne scars. This spice also improves oily skin and aids in gentle exfoliation similar to cinnamon powder. 

How to Make a Cinnamon Mask: 

Ingredients: 

1 tbsp Cinnamon powder

1 tsp nutmeg

1 tbsp honey

1 drop Cinnamon essential oil (optional)

1 drop Nutmeg essential oil (optional)

Directions: 

You can omit the essential oils if you don’t have them or if you’re skin is sensitive.  I personally love them and they add extra microbial and antibacterial elements.  

Mix all ingredients together in a small bowl.  Carefully apply to face.  The mixture will be sticky and can drip so be careful and wear old clothes if you need to. Leave the mask on for 5-10 minutes. If you are sensitive to cinnamon, it may tingle.  If it stings, immediately wash it off. 

I like to gently exfoliate my skin in circles when I’m washing it off. The cinnamon granules are perfect for smoothing skin out.

You’ll be left with super soft skin after this mask.  My skin always glows the next day! Store any leftover mixture in an airtight container and you don’t have to refrigerate it. Just be sure to use it up within a couple of weeks to a month. 

Natural Lavender and Tea Tree Face Wash

This DIY face wash is my morning and night go-to. It is so easy to make and lasts a really long time. This is great because it won’t break the bank as other acne cleansers do. Lavender and tea tree oil are great natural acne remedies.

Lavender, best natural acne remedy

Why it Works: 

Lavender: 

Lavender has so many great benefits for our skin, it’s no wonder it’s commonly used in skincare products. This plant and essential oil helps reduce redness in skin, can combat acne and helps even skintone. It also has anti-aging properties as well. 

Tea Tree: 

Tea Tree oil is one of the most popular natural acne remedies. This potent oil is anti-inflammatory and antimicrobial. This helps to keep pores clean and reduces redness. 

Jojoba Oil: 

Jojoba oil is very moisturizing. When treating acne, we want to make sure we don’t strip our skin and have it dry out. This oil is noncomedogenic and won’t clog pores. 

How to Make this Lavender and Tea Tree Oil Face Wash: 

Ingredients: 

1 (4) oz amber spray bottle

1/4 c Lavender castile soap

1 tsp jojoba oil

1/2  tbsp honey

6 drops Lavender essential oil

6 drops Tea Tree essential oil

Distilled water

Directions: 

Add all the ingredients to the amber glass bottle. Top off with distilled water. 

How to Use Your Face Wash: 

Spray a generous amount onto your palm or face scrubby. Wash face in a circular manner and wash off thoroughly. Use morning and night for best results. Follow with skin serum or moisturizer. 

best natural acne remedies

These natural acne remedies work to keep skin clean, help calm redness and even skin tone from acne scarring. With consistent use, you can help keep your breakouts under control. 

Did you try any of these products or recipes? Comment below on your experience. 

Want to try more DIY recipes? Check out these recipes for hair masks and natural lip scrubs.


Posted on 5 Comments

Micro-Goals are the Key to Success | How to Use Small Steps to Achieve Your Dreams

micro goals are the key to success

rome wasn't built in a day

Micro-Goals are the Key to Success

WHAT IS A MICRO GOAL?

MICRO-GOALS CREATE A DETAILED PLAN

weekly planner, micro-goals for success

MICRO-GOALS INCREASE MOTIVATION

turn ideas into reality

Manageable is the key to not quitting. 

MICRO-GOALS LEAD TO MORE HAPPINESS

micro goals are the key to happiness

MICRO-GOALS PROVIDE LESS CHANCE FOR FAILURE

micro-goals are the key to success

You've got this!

Micro-Goals are the key to success and one step at a time, you too can achieve your dreams!

Want more tips for success? Try these 50 Journal Prompts to jumpstart your journey. 

Posted on 2 Comments

How to Single Crochet for Beginners | Basic SC Stitch Tutorial

how to single crochet tutorial

Are you a beginner crocheter? You’ve probably come across basic stitches and wondered how to single crochet

The single crochet stitch (sc) is one of the easiest stitches to learn and it’s a great one to learn for beginners. This stitch is one of my favorites. Once you master this stitch, you will have a foundation to start working on crochet projects such as a simple scarf. 

In this free beginner-friendly crochet tutorial, you’ll learn exactly how to do the single crochet stitch with a step-by-step guide along with helpful pictures and videos to get you started!

How to Single Crochet for Beginners: 

Before we get into the nitty-gritty, let’s get our supplies together. 

  • Yarn (I’m using 100% acrylic yarn in medium weight 4)*
  • Crochet hook (I’m using I9)

*When you are a beginner, you want to use medium-weight yarn as this is easier to work with.  Match the crochet hook size to the yarn you use. This information will be available on the label. 

Single Crochet (sc) Stitch: 

The single crochet stitch is done by inserting your hook into the stitch

how to single crochet with photos

Then you will yarn over. Now you will have three loops on your hook. 

how to single crochet step by step guide

Pull through the stitch and you will have two loops on your hook. 

how to single crochet

Yarn over and pull through both loops. 

single crochet tutorial

Here is how you do a Single Crochet Stitch from Start to Finish

Tie a slip knot onto your crochet hook. 

Foundation: Chain 10

Row 1: Single crochet (sc) in second from hook. sc to the end. Chain 1 and turn.

Row 2: Skip first stitch and single crochet to the end. (9 stitches)*

Repeat as many times as you would like to practice. 

*There are two ways of starting a new row. Sometimes crocheters will count the chain one at the start of a row as a stitch. In this case, you will start your single crochet in the second stitch. If a pattern says that chain one does not count as a stitch, then single crochet into the first stitch. 

However you choose to do it, make sure your stitch count is correct to ensure straight edges as you proceed from row to row. 

Are you a visual learner? Here is a video tutorial for the single crochet. 

And if you’re looking for a full tutorial with how to make a slip knot, foundation chain, and single crochet stitch, check this video out. 

Great job! Now you have mastered the single crochet stitch. If you continue adding rows, you will end up with a nice thin scarf in no time!

You can apply your single crochet skills in this beginner-friendly crochet dishcloth pattern.

Did this tutorial help you? Comment below!

Posted on 1 Comment

Want Long, Thick and Luxurious Hair? Try these Natural Indian Hair Masks! (Free DIY Recipes)

long thick and luxurious hair, indian woman

Who doesn’t want long, thick and luxurious hair? Indian hair is highly sought after in the wig industry for its shine and length.  

how to get healthy long hair naturally

Ever wonder how Indian hair gets to be so healthy and beautiful? My whole life my friends, co-workers, and random people on the streets complimented my hair.  

I routinely grow my hair for 3 years and then chop it off to donate.  It grows so fast,  one time I chopped it off and a month later a friend remarked, ‘it doesn’t even look like you cut it, it’s long again.

The thing is, I wasn’t doing anything crazy with my hair. I just followed what my mom and grandmother did. And, it works because it’s natural.  There aren’t weird ingredients and things you can’t pronounce.

Just good old ingredients right from nature. 

Read on for all the natural hair secrets for long, thick, and luxurious hair. You’ll have healthy hair in no time.  

This post contains affiliate links. If you use these links to buy something I may earn a commission. Thanks!

Why use Indian tips to Get Long, Thick, and Luxurious Hair?

Did you know that India is the largest supplier of human hair for wigs and extensions? Women go to temples in India to shave off their long tresses. The hair is then sorted, cleaned, and auctioned off. One temple in India makes anywhere from 25-40 million dollars a year selling the hair. 

Indian’s are genetically blessed with thick hair, but they also use a lot of natural hair care products that have increased the value of their hair. 

The Secret To Healthy and Long Hair

The one thing Indians do routinely for healthy hair is oiling it. We deep condition our hair with nutrient-dense oils once a week.  

hair oils for long thick luxuriousd hair

When I was younger,  every Friday night was oil night. My mom brushed my hair until it was smooth and tangle-free. This took some time as a kid,  I always had tons of knots!

Then she’d use this green oil that had a distinctly Indian scent. She’d massage into my scalp and work it all the way into the ends. After 10 minutes, I’d feel so relaxed. For best results, we always slept with our hair oil mask overnight and washed it out the next morning.  

Put it in a braid and sleep with a towel over your pillowcase to avoid staining.

Why Hair Oil Masks Work Wonders

Oiling your hair injects moisture into your hair.  There are many health benefits to an oil hair massage. 

  1. You stimulate your scalp which allows hair follicles to strengthen and be more active. 
  2. Nutrients penetrate better with massaging 
  3. It helps with hair loss
  4. Shinier and stronger hair

What are the best oils for healthy hair?

My mom always used Indian oils on my hair as a kid.  It’s green and very potent. Usually, it is made with Indian Amla (gooseberry). Amla oil helps stimulate your scalp, controls premature greying, and helps with hair growth as it strengthens hair follicles. 

Indian Gooseberry for healthy hair

As I got older,  I experimented with all kinds of oils.  I now use a combination of oils to maximize the benefits.  Here are commonly used oils:

Castor Oil:

Castor oil comes from a plant that is native to Asia and Africa. It is a vegetable oil pressed from castor beans. Castor oil is known for its thick consitency and it is better to mix this oil with others due to its stickiness. This oil is rich in healthy fats such as the fatty acid ricinoleic acid. 

This vegetable oil helps lubricate the hair shaft and protects it from damage. Fatty acids provide proteins and nutrients to hair follicles. It also can help those with dandruff issues. 

Olive Oil:

This popular oil comes from Meditteranean olives. While we traditionally use this in our foods and with yummy breads, olive oil has tremendous hair care benefits as well. 

This oil has a moisturizing effect on the hair and it gives it softness and strength. Olive oil is great for getting that shine that makes hair sparkle. If you have a dry scalp, this is the perfect oil for a head massage due to its moisturzing properties. 

Jojoba Oil: 

Produced from jojoba seeds, this oil is native to southwestern USA. Jojoba oil is rich in many vitamins that are vital for hair growth. This oil is great for preventing hair loss and promoting hair growth. 

Jojoba oil also is moisturizing like olive oil and great for dry scalps and combating dandruff. 

Coconut Oil: 

Coconut oil is my favorite oil to use in my hair serum bases. It was also my grandmother’s go to as well. This oil smells great and has so many great benefits for our hair. This popular oil moisutrizes hair, protects it from enviornmental damage, and helps prevent protein loss and damage when wet. 

This vegetable oil is a powerhouse for hair care. Use fractionated coconut oil for best results. This oil stays liquid at all temps and won’t solidify. 

Honorable Mentions: 

While I personally don’t use these oils in my hair serums, they are also great for hair growth and care so they deserve a mention!

Avocado Oil

Sweet Almond Oil

Essential Oils for Hair:

While adding essential oils to hair oils isn’t a traditional Indian thing to do,  I’m adding it to the list because essential oils are powerful, potent and non-toxic. They make great additions to hair serums and smell great too!

Lavender 

Peppermint 

Rosemary 

Cedarwood

Thyme

Tea Tree

DIY All Natural Hair Serum Recipes:

Use these hair masks once a week for the best results. You can change it up to maximize the benefits to get long, thick, and luxurious hair in no time. 

Deep Conditioning Hair Mask:

1 tbsp fractionated coconut oil

1 tbsp olive oil

1 tsp castor oil

1 tsp jojoba oil

Essential oils (optional)

This mask is great to use when your hair really needs some TLC. Watch your hair turn silky soft overnight. 

Thick Hair Mask:

1 tbsp fractionated coconut oil

1 tbsp jojoba oil

Essential oils (optional)

This hair mask recipe will thicken hair when consistently used. 

Shiny Hair Mask:

2 tbsp olive oil

1/2 tbsp fractionated coconut oil

Essential oils (optional)

Your hair will bring all the shine with this olive oil-based hair mask.

Long Hair Mask

1 tsp castor oil

1 tbsp coconut oil

1 tbsp olive oil

Essential oils (optional)

Feel free to experiment with the oils and use them more or less depending on your hair length. If your hair is on the drier end, use more. Be sure to wash well the next day. I usually wash my hair twice to get all the oils out. My hair is always left silky soft and never greasy. 

Other Indian Tips for Healthy Hair:

Along with maintaining good hair hygiene and routine oiling, here are some other things to try for long, thick, and luxurious hair. 

  1. Wash it 1-2 times a week instead of daily. Overwashing removed oils and dries out your hair. 
  2. Use natural cleansing methods such as yogurts and chemical-free shampoos.
  3. Braid hair loosely and avoid tying it up too tightly. Tying it tightly leads to breakage and pulls on your skin which will lead to premature wrinkles.

Did you try these DIY natural hair masks for long, thick, and luxurious hair? Comment below!

Interested in other DIY non-toxic recipes? Try our 5 DIY Natural Lip Scrubs with Essential Oils.