Posted on 4 Comments

Dash Rapid Egg Cooker Review: Should You Get One?

DASH Rapid Egg Cooker Review

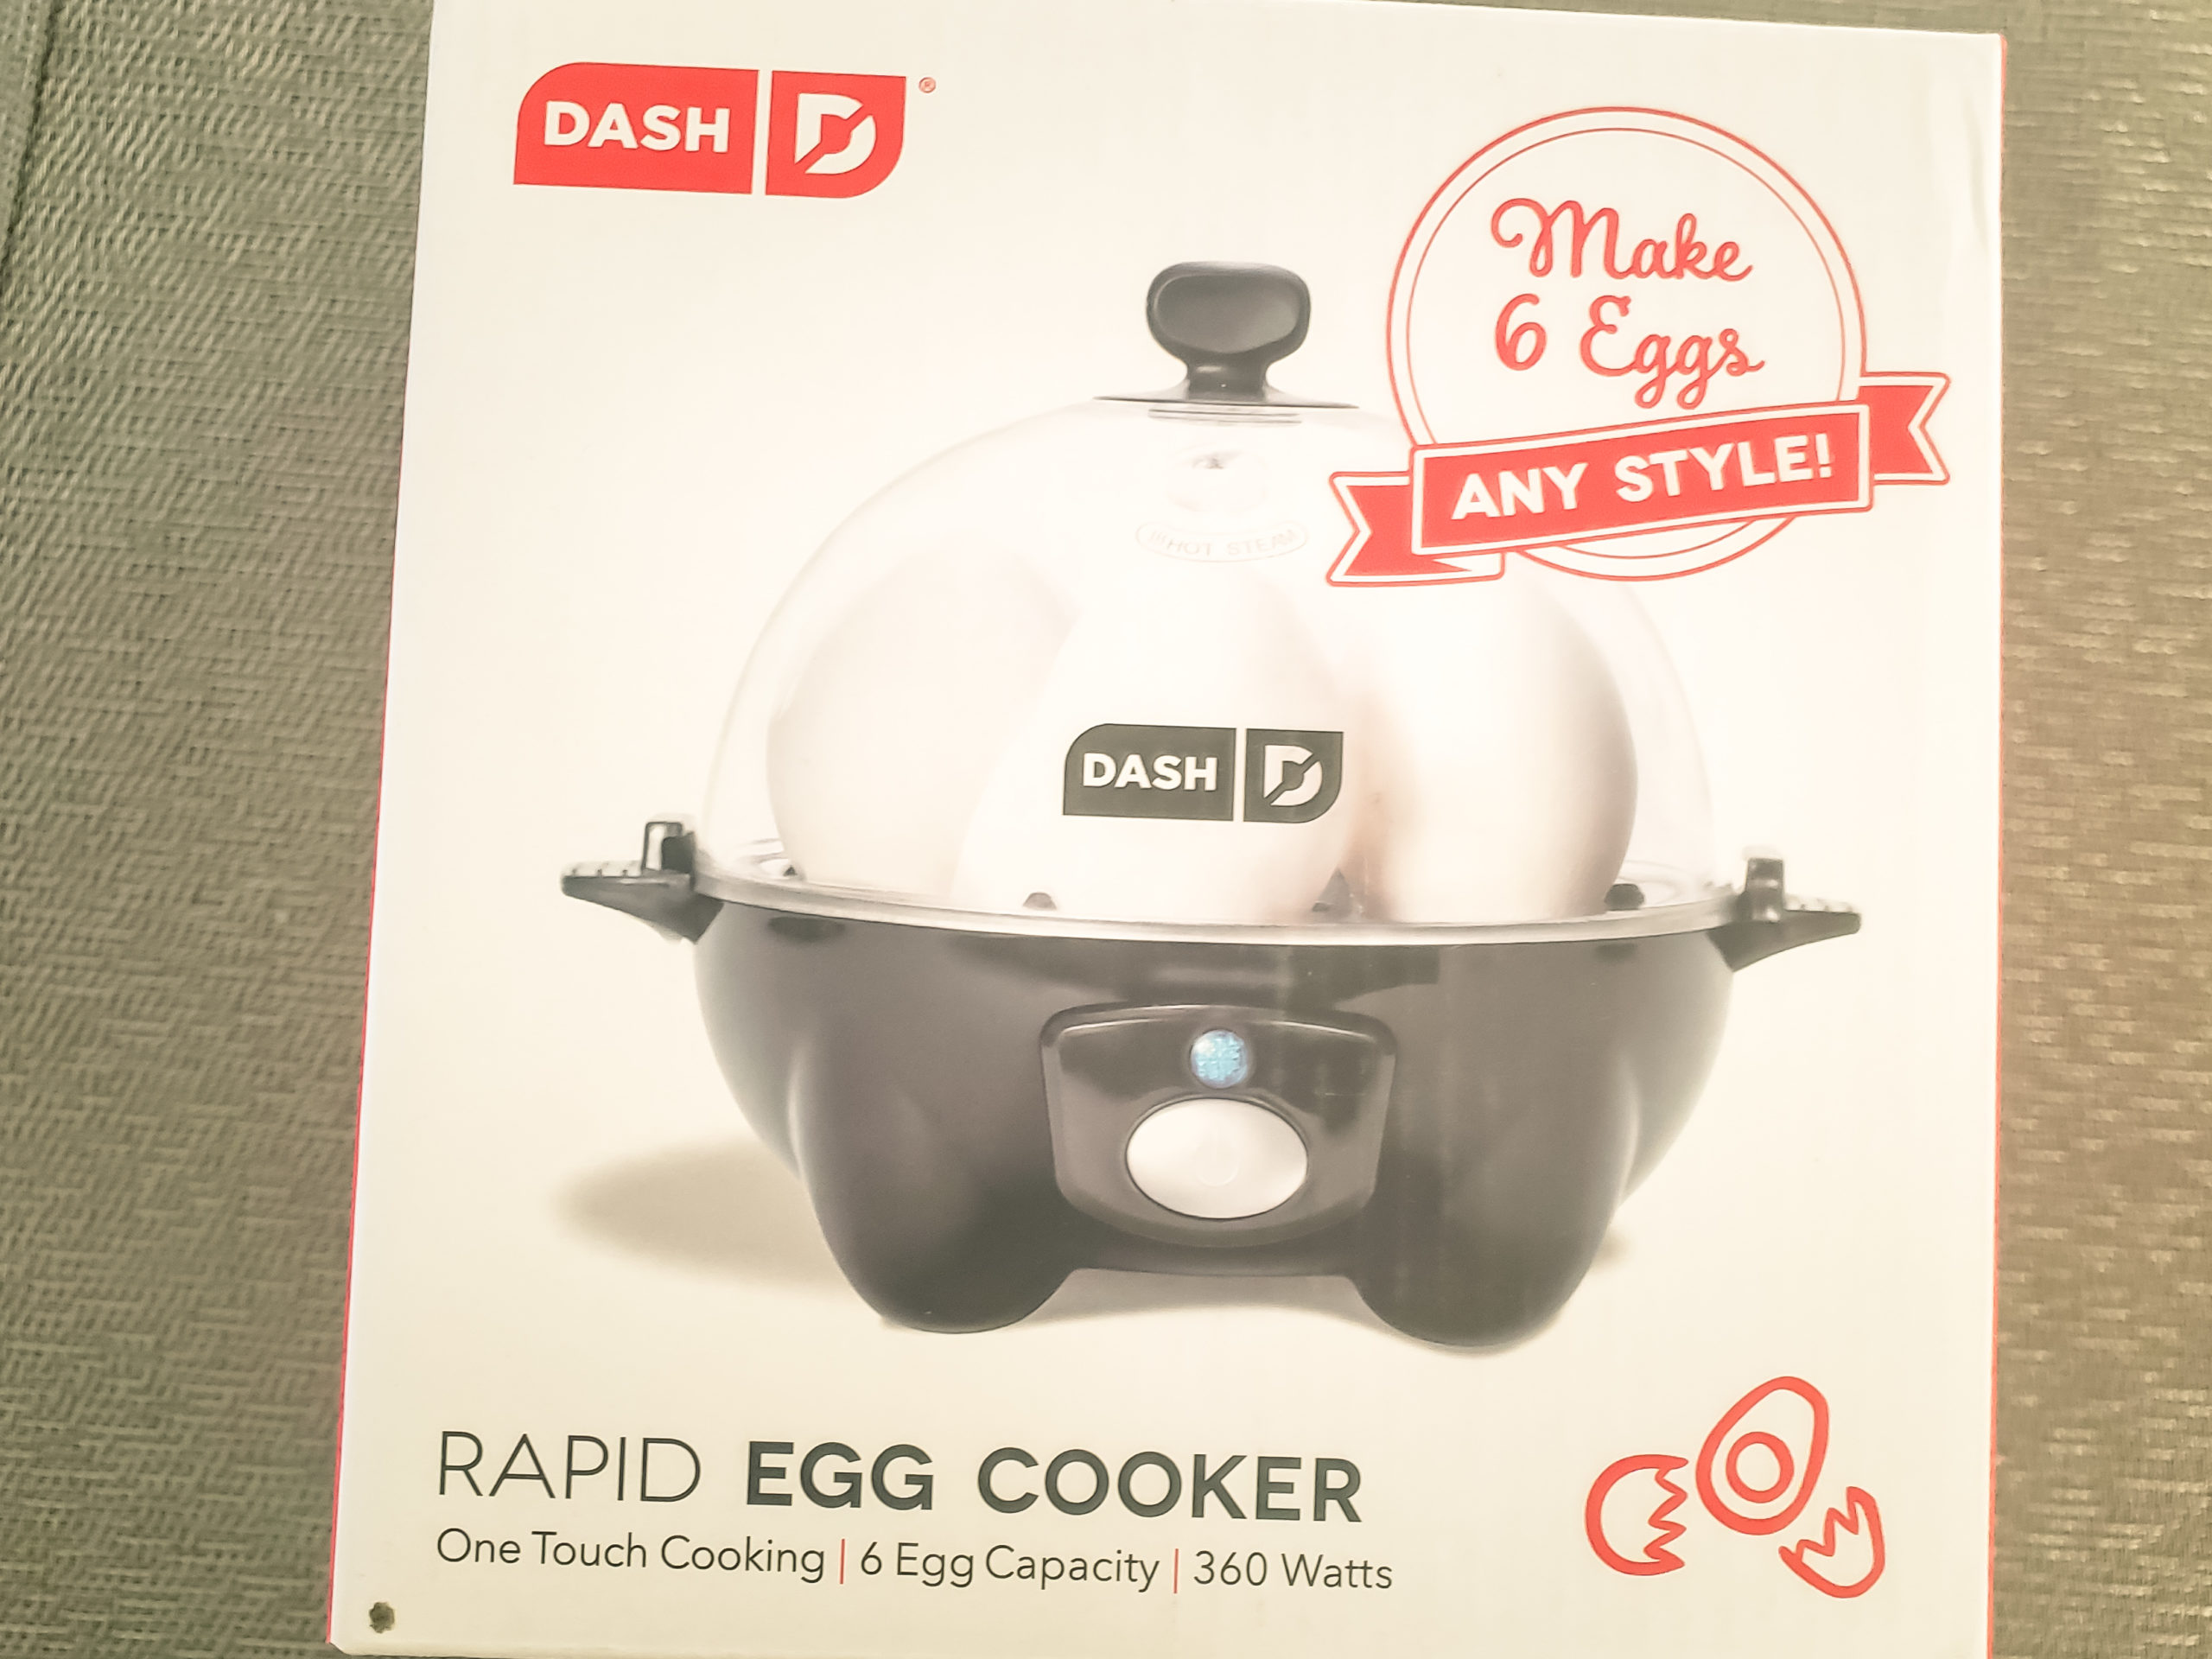
I am obsessed with eggs. Scrambled…omelets..hard-boiled…yum! Since eggs are big in our household, I’m always looking for ways to cook them efficiently. Recently, we received an egg cooker as a gift for our upcoming wedding. This article will focus on an in-depth DASH Rapid Egg Cooker Review: what is it, how to use it, and should you get one? 

There are definitely lots of pros to this appliance. Cook everything in one place with little mess, yes, please! I absolutely hate having to clean stuck-on egg bits from pans after making scrambled eggs. I can never seem to find the right non-stick pan that eggs won’t stick to! 

In this review, you will also find some cons to the appliance and tips and tricks to make the appliance work efficiently. 

This post contains affiliate links. If you use these links to buy something I may earn a commission. Thanks!

DASH Rapid Egg Cooker Review

What is the DASH Rapid Egg Cooker? 

DASH Rapid Egg Cooker

The DASH Rapid Egg Cooker is a 6 egg capacity egg cooker for hard-boiled, poached, scrambled eggs and omelets. It has options for soft/medium/hard-boiled eggs and works fast to save you time and water. Weighing under a pound, the egg cooker is lightweight and compact. An auto-shut-off feature prevents overcooking (no more gray/green yolks in hard-boiled eggs!). 

With over 36k reviews on Amazon, this rapid egg cooker is very popular. It’s also affordable at a price point of $19.99. 

Unboxing the Egg Cooker

Unboxing DASH Rapid Egg Cooker, Boiling Tray, Poaching Tray, User Manual

When we received our DASH Rapid Egg Cooker, we were pleasantly surprised by how compact the appliance was. I am a big cook, and I love my kitchen gadgets. It’s essential to me to have something that doesn’t take up much space as I already have a storage unit filled with appliances. The egg cooker is 6.5 inches tall and 7.5 inches wide, taking up less than a foot of space!

The egg cooker comes with a boiling tray to make hard-boiled eggs (cook up to 6 at a time), a poaching tray (cooks up to 2 eggs at a time), and an omelet tray (cooks up to two eggs at a time), a measuring cup for water, and a handle attachment to help lift the boiling tray.

At first glance, the omelet tray is small. Think petite single-serving versus the giant ones you get at a diner. 

Also included is an instructions manual. The booklet outlines how to cook different types of eggs as well as recipes. You’ll find other foods you can cook at the very end of the booklet, such as broccoli!

How to Use the DASH Rapid Egg Cooker? 

Though the egg cooker is straightforward to use and does work rapidly, it is not foolproof. There is some experimentation with how much water to add as it does not correlate to what the manual says. This isn’t a dealbreaker; it just means there is some trial and error to achieve the perfectly cooked eggs you want. 

Even with this limitation, the egg cooker is much more efficient than having to boil water stovetop. 

How to Make Hard-Boiled Eggs with the DASH Rapid Egg Cooker: 

Making hard-boiled eggs is super easy with this cooker. 

  1. Start with the unit unplugged. 
  2. Use the provided measuring cup to pour the designated amount of cold water onto the heating plate.*
  3. Insert boiling tray handle into the boiling tray and place it on top of the heating plate. 
  4. Add eggs to the boiling tray slots (up to 6 eggs). 
  5. Cover the lid and plug in the cooker. 
  6. Press the power button to start cooking. 
  7. When the eggs are done, and the water has boiled off, the machine will sound (a jingle will play). Press the power button to silence the buzzer. 
  8. Uncover the lid and remove eggs with tongs. Be careful when opening the lid as it will be hot and steamy.
  9. Place eggs in cold water to stop cooking. 

Notes: 

  • The amount of water placed into the boiling tray in step #2 will change depending on how many eggs you use and the size of the eggs. For 6 eggs, I filled the measuring cup up to the hard-boiled line and then added another half of the cup. This was the perfect amount and the eggs cooked perfectly. 

How to Make Poached Eggs with the DASH Rapid Cooker: 

Poached eggs in Dash rapid egg cooker

Poached eggs are significantly easier with the appliance, though similar to the hard-boiled eggs, you have to fiddle with the water measurements. 

  1. Fill the provided measure cup with cold water to the “Omelette/Poached” line. Pour onto the heating plate.*
  2. Place the boiling tray over the heating plate. 
  3. Lightly spray cooking oil onto the poaching tray and place it on top of the heating plate. 
  4. Break an egg into the poaching tray slot (capacity for 2 eggs). 
  5. Cover the lid, plug into the socket, and press the start button. 
  6. When the buzzer sounds, turn the power off. Carefully remove the cover lid, be careful with the hot steam. 

Notes: 

  • The first time I used the poaching tray, I used both slots to make 2 eggs. I followed the directions for the water, and it was not enough. The bottom of the poached egg was still runny. I realized I need to double the water for 2 eggs. The poached eggs turned out wonderfully after I got the water ratio right. It cooked fast, comes out of the tray easily, and had a great texture. 
  • If you cook and find your eggs are runny, simply add some more water to the heating plate and cook again. 
Measuring Cup with water
Not Enough Water for Poached Eggs

How to Make an Omelet with the DASH Rapid Cooker: 

uncooked omelet in DASH rapid egg coooker

Omelets are my favorite thing to make so far with the cooker. They turn out really nice, and I love the ease of making it. 

  1. Fill the measuring cup with cold water to the “Omelette/Poached” line. Pour water onto the heating plate.*
  2. Place boiling tray on top of the heating plate. 
  3. Spray cooking oil to the omelet tray and place it on top of the boiling tray. 
  4. Add your eggs and any fixings to the omelet tray. 
  5. Cover the lid and plug in the appliance. Press the power button to start cooking. 
  6. When the buzzer sounds, turn the power off. Carefully remove the cover lid, be careful with the hot steam. 
  7. Remove eggs with a spatula. 

Notes: 

  • I used more water than the marking on the measuring cup for the omelet. My first omelet was not cooked fully underneath. I used 1.5 times the designated amount, and this cooked perfectly. 
  • If you find the bottom of your omelet is runny, add more water to the heating plate and cook again. 

What Else Can You Make in the Egg Cooker? 

I was pleasantly surprised to see that I could cook other items aside from eggs in the cooker. Since it is a steamer, it works great with veggies. Here are some items you can cook: 

  • Broccoli
  • Asparagus
  • Edamame
  • Frozen Corn

Bowl of green Broccoli

Regarding the DASH Rapid Egg Cooker review, this feature is a huge plus in my book. I love that I can use one appliance to make breakfast and have a side of veggies. It really helps with keeping the dish load down. However, due to the compact size of the cooker, you can’t make huge amounts at a time. It really is for one serving. So if you are cooking for a family, I don’t suggest using this to steam veggies. 

For breakfast, this works for me as I only cook for myself. So far, I have tried steaming broccoli and spinach with great success. 

How to Clean the Egg Cooker: 

One thing I absolutely love about this egg cooker is how easy it is to clean. I HATE doing the dishes. This appliance cleans really easily, and that really cuts my workload to focus on other things. 

After you are done cooking, let the machine cool down. You can wash the boiling tray, poaching tray, omelet tray and cover the lid in the sink with warm soapy water. When the appliance has fully cooled, wipe down the heating plate with a wet cloth. 

And that’s about it!

You can store all the parts within the cooker, so that makes it super easy to store. 

Over time you may need to do a deeper cleaning of the heating plate with a water/vinegar solution to remove mineral deposits. The manual mentions the egg cooker won’t rust. 

DASH Rapid Egg Cooker Review: Should You Get One? 

Overall, I do recommend this product. Ever since I got it, I have used it every morning for my breakfast.

Pros: 

  • Easy and efficiency
  • Compact
  • Affordable
  • Easy to Clean

Cons: 

  • The water measurements needed do require some experimentation to cook the eggs fully. 
  • Some people don’t like the buzzer sounds at the end of cooking. I don’t mind it; it’s nice-sounding music. 
  • When using the appliance to steam veggies, keep in mind the size is small.

If you’re looking for an egg cooker that cooks rapidly and doesn’t require much work, this is it. 

I hope you enjoyed this Dash Rapid Cooker Review. Want to see more reviews like this? Check out the Bertello Pizza Oven Review

Posted on 9 Comments

Bertello Pizza Oven Review (With Recipes and Photos)

Bertello pizza oven review, wood fired pizza oven

I am a big pizza fan!  I mean, who isn’t?! Growing up on the east coast,  pizza was a big part of life.  After moving to the west coast,  it’s been tough finding good pizza.  My in-laws recently gifted us a Bertello pizza oven, and it’s been a wonderful experience. This post will focus on an in-depth Bertello pizza oven review, a step-by-step guide on how to use the pizza oven, followed by some yummy pizza recipes

Wood fired Margherita Pizza


Bertello Pizza Oven Review

Why choose a pizza oven for your home?

You have a conventional oven; why do you need a wood-fired pizza oven? 

Pizza ovens get significantly hotter than your conventional oven (upwards of 800 degrees). This leads to cooking pizzas so fast! Wood-fired ovens work by trapping heal within the walls of the oven. It is also a very traditional way of making pizza. 

If you want NY-style pizza, you have to replicate how they cook their pizza. Granted, you won’t have the New York water to get the distinct flavor, but it will still be very delicious! Definitely better than anything you make in the regular oven. 

The wood-fried aspect really gives the pizza a deeper flavor.  

pizza oven and wood fired pizza

What is the Bertello Pizza Oven?

Featured on Shark Tank,  this oven is a good budget option at the $300 range.  We came across it when we were doing our Amazon wedding registry, and it had great reviews. You can get it on Amazon.

Created by entrepreneur brothers, Andy and Eric Bert, the mini outdoor oven is portable. It is also a hybrid model, meaning you can use wood as fuel or propane. The pizza oven can go past 900F and produces authentic Neopolitan pizzas in under 2 minutes. 

If you use propane, you’ll need to purchase a propane tank and gas attachment.  We did not go the propane route, and our pizzas still cook beautifully and taste amazing!

The oven itself is on the smaller side and works well if you don’t have a lot of space. We have a small balcony, and the oven fits perfectly there. It’s nice to have the pizza oven experience without having to spend a huge amount of money and need a giant backyard. 

Bertello pizza oven review, wood fired pizza oven

Getting Started with the Bertello Pizza Oven 

There is definitely a learning curve to using this oven,  so be sure to do your research before starting.  My husband and I were too excited, and we did minimal research, which consisted of reading amazon reviews and watching some YouTube videos.  

Unboxing the Oven:

The oven is very easy to put together.  It is heavy, so I definitely appreciated that my husband put it together. 

The instructions helped with getting the oven together. But it was not helpful in providing a step-by-step guide of how to use the Bertello pizza oven. Through trial and error,  we have figured out a system that works for us now. 

The Bartello oven comes with the following:

  • Pizza stone
  • Wood/Charcoal/Fuel Tray
  • Tongs
  • Pizza peel
  • Scoop for wood chips/pellets

Detailed Bertello Oven Pizza Review

Attempt #1:

Our first attempt at the oven was late on a Friday evening. We were very excited to try it out. However, I don’t suggest doing this at night. It’s easier to see what you are doing during the daytime. When you get better at using the oven, you can use it at night if you like. 

For fuel, we bought the following from Home Depot:

We loaded 6-7 charcoal briquettes into the back slot and lit them in the fire with tumbleweed as a starter. We saw in a YouTube video that you should light the coal and leave it for about an hour until it turns white.  After this,  you add wood and pellets to get the fire going.  

Our first attempt was disastrous. Our fire was nowhere near what it should have been, and the pizza stone was not heating up properly. We stupidly put the pizza in, and it stuck to the bottom.  It was a disaster!

We also had a lot of trouble trying to get the pizza off of the peel and into the oven.  It would stick and clump together. 

We ended up with 1 pizza that was semi-edible.  But overall, this was a FAIL!

Attempt #2

We played around with the fire to get it roaring. We were able to build it up but ran into similar issues of the oven not heating towards the front end.  This would lead to the pizza sticking and being impossible to turn.  We ended up with a couple of “calzones.” 

We watched the video from the creator, who did help a bit with arranging the pizza.  We were loading our pizza with too much sauce and cheese.  You really have to go minimalistic with toppings. 

Attempt #3

My husband was ready to call it quits at this point.  We didn’t understand how it was so easy for others, but we were having so much trouble. O

Was it not using propane? Or should we get a temperature gun? Our Bertello oven review wasn’t looking so great thus far. But, we didn’t want to give up either. Other people had such great photos and enjoyed their oven. 

We had to figure out what we were doing wrong. 

Finally, after an hour of scouring the internet, we happened upon this gem of a video. 

We saw that for the oven to really work,  the flames have to hit the roof of the oven and almost come out the front. Watch the video, and you’ll see epic flames.

We had a baby fire going and thought that would be enough.  A lightbulb went off, and we decided to try again, this time armed with knowledge.  

Here is the exact process we used.  Follow this, and you’ll have amazing wood-fired pizzas in no time!

How to Use the Bertello Pizza Oven (With Pictures)

1.) Situate the oven onto a stable table. We use two end tables and it works great. Add 4-5 charcoal briquettes to the fuel tray. Place tumbleweed in the center to create a pyramid. Light on fire and close the door cover. Let it do its thing for 30 min to an hour until the coals turn white. 

Pizza oven tray with coal bricks and tumbleweed

How to light fire in pizza oven

2.) In the meantime,  prep your pizza dough and toppings. I used this recipe from Bobby Flay, which turned out beautifully. Due to the size of the oven, we stuck to smaller personal sizes. You can make 6 pizzas with the Bobby Flay recipe. 8-10 inches is a good size for this oven. 

3.) When rolling out your pizza dough,  use a generous amount of flour, so it doesn’t stick. I like to use this silicone mat as it has convenient templates for pizzas by inch so you can roll to the correct size.  Sprinkle flour onto your pizza peel, and transfer rolled dough to it. I used all-purpose flour. You want enough so the dough doesn’t stick. 

4.) Add a 1-2 spoonfuls of sauce.  It doesn’t sound like much,  but that’s really all you need.  Add your toppings, don’t overdo it. Keep it light.  

Uncooked four cheese pizza on pizza peel

5.) Check the oven to see if it’s ready.  When the coals are white,  add your wood chunks and/or pellets.  We use half a cup to a cup of hickory pellets.  Wait until the fire is roaring. This will take a couple of minutes. You can use a fan blowing towards the back tray door to help it along.  You can also use a temperature gun to check the temp,  but we don’t. If you do use a temp gun, you’ll want the back to be around 800F and the front higher than 500F. 

Wood fired pizza oven, roaring flames, bartello pizza oven

6.) When it’s ready, and the flames are hitting the top roof,  slide your pizza in. You want to aim for the middle of the oven. We have had success when it’s been more towards the front, but this is volatile as it’ll depend on how hot the front of the stone is. If your fire is really roaring, you’ll be able to do this. 

7.) At this point, you’ll need to watch to check when to turn your pizza.  Sometimes we’ve turned it in every 20 seconds, and other times every 5 seconds.  You’ll know to turn when cheese is bubbling.  Turn 4 times, so it cooks evenly.  Be patient, as this process can take some time to maneuver. Depending on how hot the oven is, sometimes burns will happen. It’s trial and error and with repeated use,  you will become a pro. 

8.) Your pizza should be done in a minute or two! We try to have a backup pizza ready to go so we can put it in just as the first is finishing. The fire should last 1-3 pizzas before you need to refuel.

Wood fired Margherita Pizza

9.) Refueling is easy. Just add more wood or pellets. 

Notes:

There are certain tools that can help you with the process of making pizzas in the oven—a temperature gun and turning peel.

Using this oven is definitely a two-person job.  You probably could do it with one person,  but it might be stressful. More helpers speed up the process.

Making your own pizza at home can be a process,  but we really enjoy it now that we know what we’re doing.  Our final Bertello oven review is that it is a fun thing to have.  Our oven gets a lot of use in our home, and we do weekly lunch dates with friends to use it.  Everyone loves it! It’s a great activity to do with the company. 

Plus the pizza tastes amazing!

Here are some of our favorite recipes:

White Four-Cheese Garlic Pizza Recipe

Wood fired white four cheese pizza with garlic and olive oil

Ingredients:

Homemade or store-bought pizza dough

1 tbsp Olive oil

Mozzarella cheese sliced

Ricotta cheese

Shaved Parmesan

Grated Romano

1 clove Garlic sliced

Directions: 

1.) Roll pizza dough to 8-10 inches

2.) Spread 1 tbsp olive oil to coat the top.  

3.) Add garlic slices and top with cheese

4.) Bake in the wood fried oven for 1-2 minutes 


Classic Margherita Pizza Recipe

Wood fired Margherita Pizza

Ingredients: 

Homemade or store-bought pizza dough

1-2 tbsp Pizza sauce

Mozzarella sliced

Chopped basil

Directions:

1.) Roll pizza dough to 8-10 inches

2.) Spread 1-2 tbsp pizza sauce

3.) Top with Mozzarella slices and basil

4.) Cook for 1-2 min in the pizza oven


Spicy Wood Fried Pizza Recipe:

Spicy wood fired pizza recipe

Homemade or store-bought pizza dough

1-2 tbsp Pizza sauce

1 tbsp hot oil

Mozzarella sliced

Romano Grated

Jalapeños slices

Directions:

1.) Roll pizza dough to 8-10 inches

2.) Spread 1 tbsp hot oil

3.) Add 1-2 tbsp pizza sauce

4.) Top with Mozzarella slices and grated Romano. Add Jalapeños.

5.) Cook 1-2 minutes in the pizza oven. 

How to Care for Your Pizza Oven

Now that you’ve made all the yummy pizza in your belly, you’ll need to clean your pizza oven. This is pretty low maintenance. After your oven has completely, remove the fuel tray and discard the ashes. You can use an old towel or paper towels to wipe the inside clean. 

Next, you’ll want to clean your pizza stone. Pizza stones are porous items and you want to refrain from using soap on your stone. This is because the stone will absorb the soap and you’ll pizza will taste like suds. Pizza stones don’t need soap anyway as the heat from the fire will kill bacteria. 800+ degrees is really hot!

To clean your pizza oven: 

  1. Scrub off any food particles. Use either a sponge or a wooden spatula. Don’t use metal as you will damage the surface. 
  2. Using just water, gently scrub the surface. 
  3. If your surface is burnt, mix 50:50 part water with baking soda. Spread the paste and let it sit for 5-10 minutes. Wash away with water and repeat as needed. 
  4. If your pizza oven is severely caked, you can put it in a conventional oven at 500F. Place the stone on the top rack right when you turn the oven on. Do not put the stone into a hot oven, it needs to rise in temperature slowly. Leave in for about an hour. After the oven and stone have cooled, remove and scrub off burnt bits.
  5. After you’ve cleaned the pizza stone, return it back to the oven. We store our oven outside on our balcony.

I hope you enjoyed this Bertello Pizza Oven Review.  Did you try any of these recipes? Comment below!

Subscribe to the newsletter to keep updated on blog posts. Follow me on Instagram @by.bindi. 

Did you eat too much pizza? Check out 11 Ways to Lose Weight and Keep it Off