Posted on 8 Comments

Homemade Olive Oil Body Cream with Essential Oils

Whipped Homemade Olive Olive Body Cream Recipe with Shea Butter and Essential oils

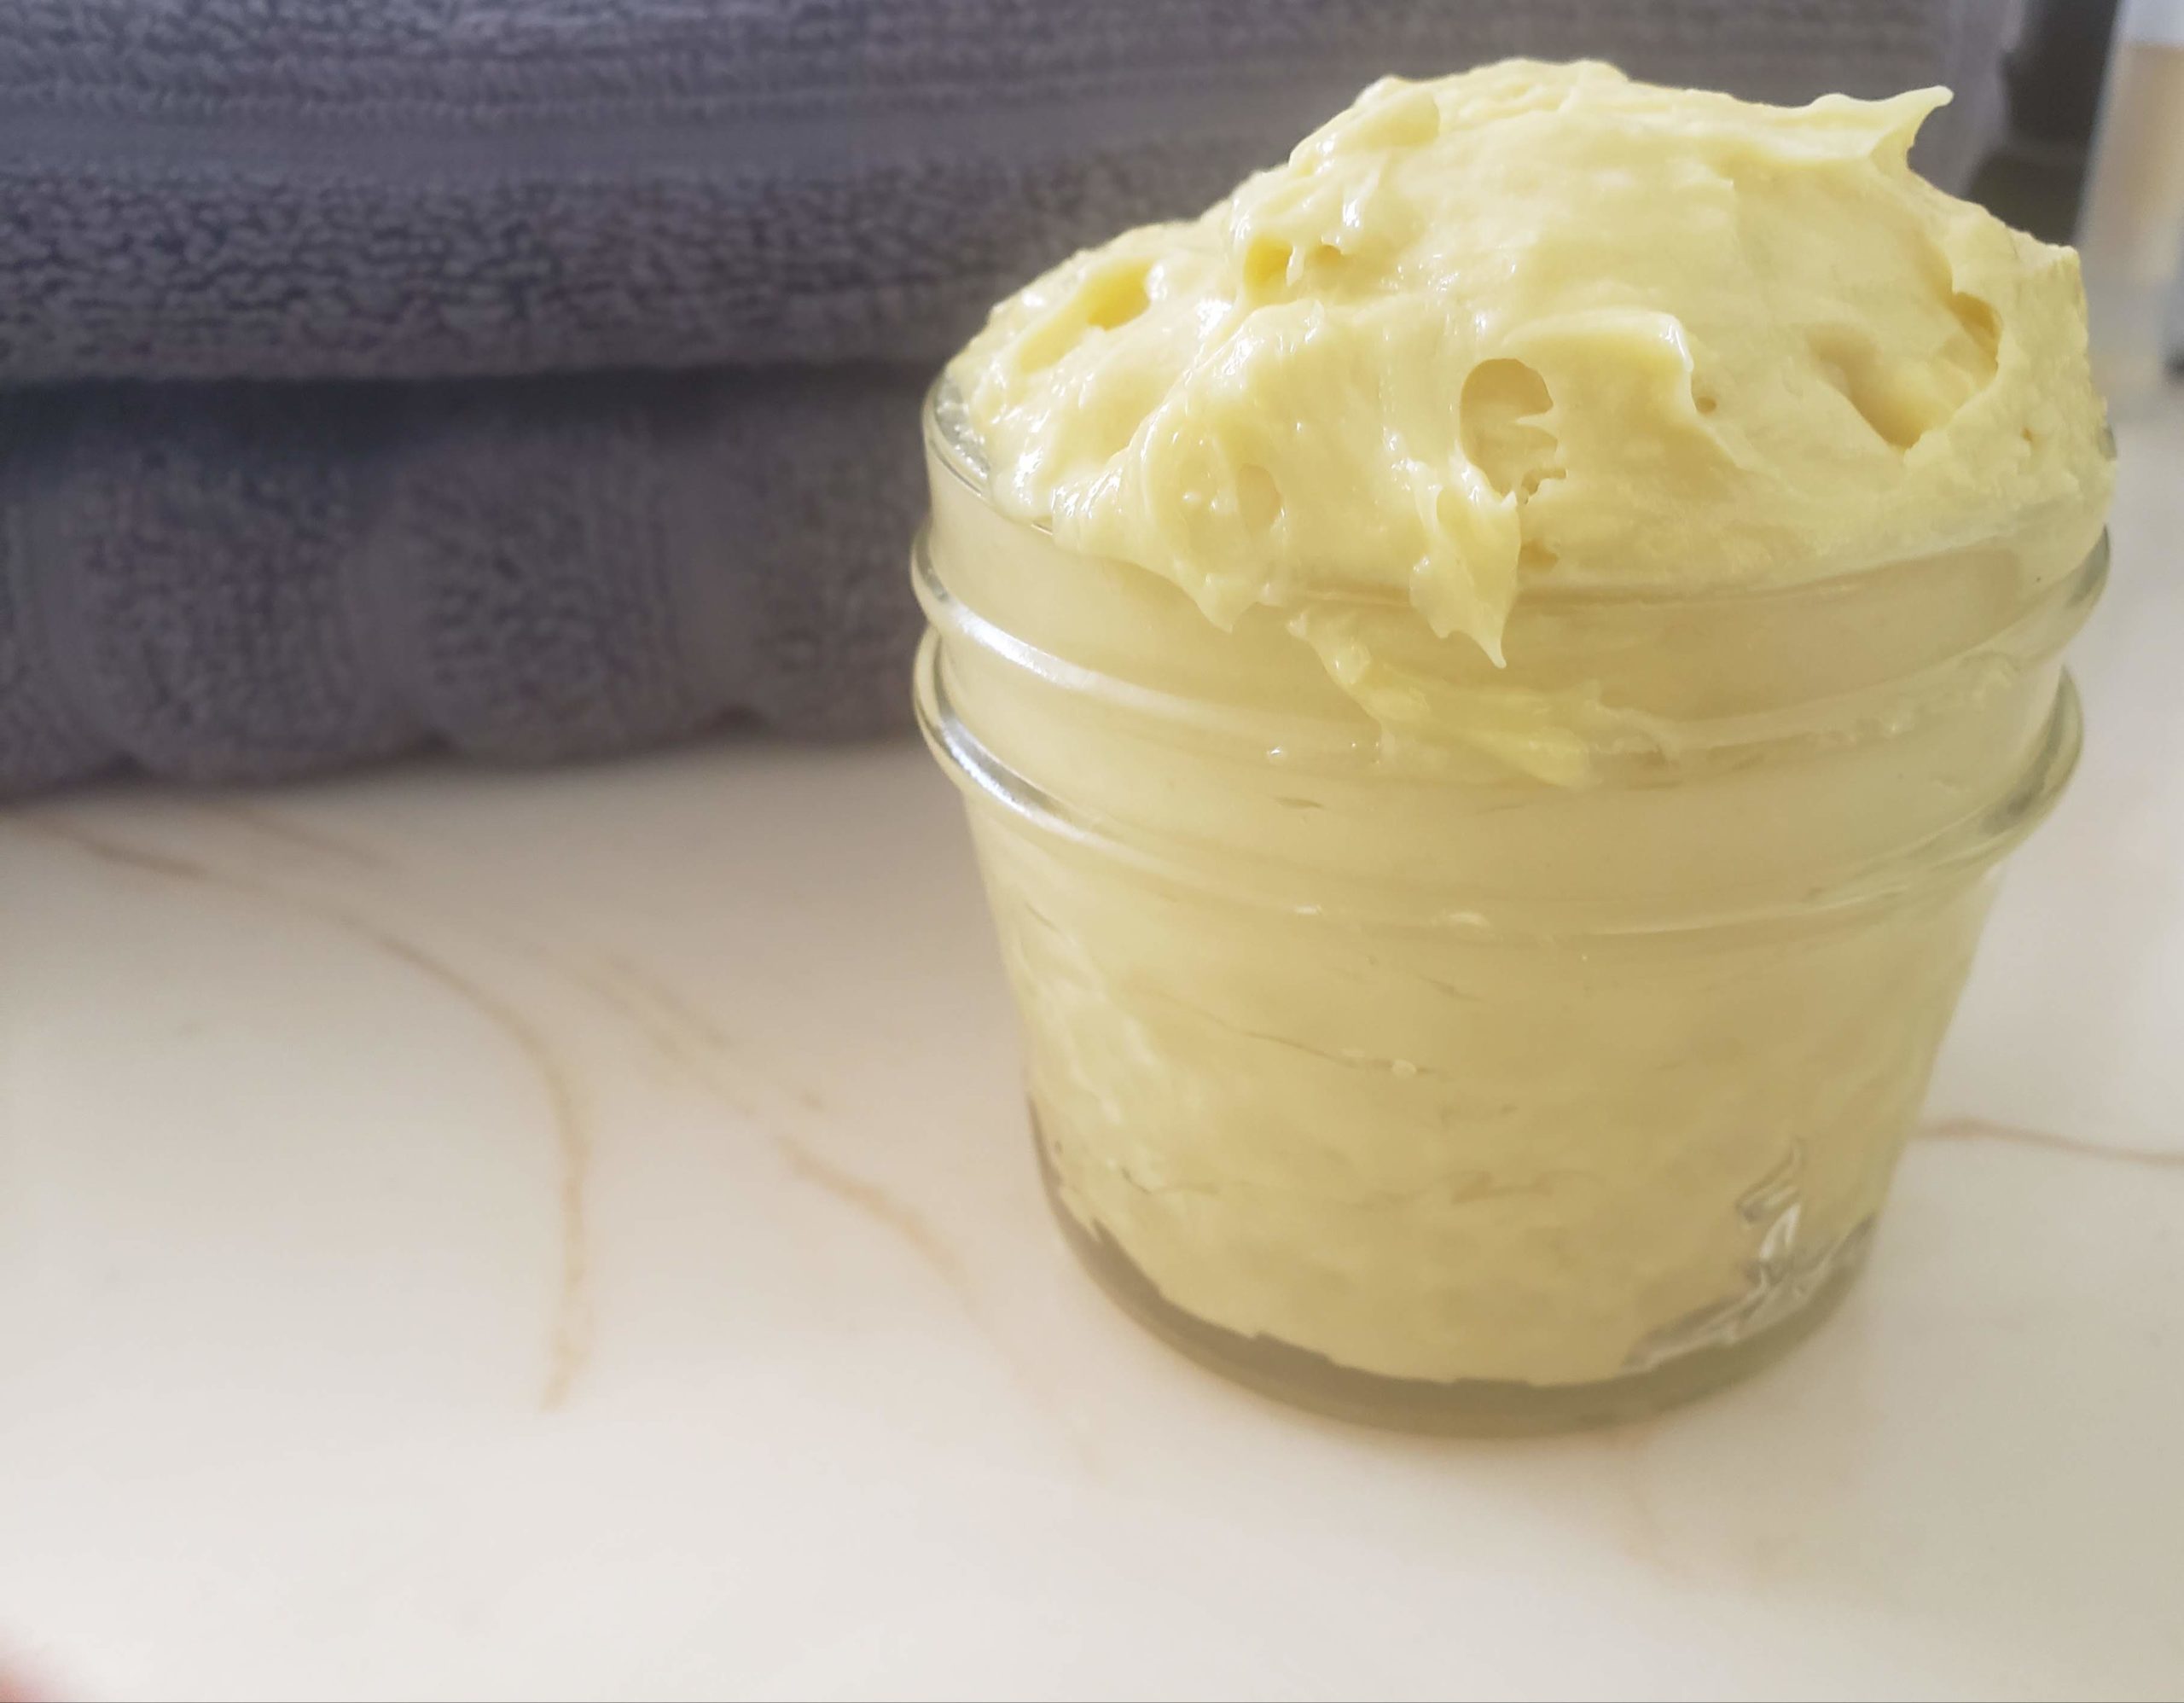
Raise your hand if you are plagued with dry, ashy skin. My skin always needs some tender loving care, namely a good skincare routine. This recipe for homemade olive oil body cream is heavenly, easy to make, and smells divine with essential oils!

 I recently got into experimenting with DIY body butter as I love making clean beauty products at home. Things don’t always go well at first, though. My first batch of moisturizing body cream turned out too stiff. The cream whipped up, but it wasn’t as fluffy as  I thought it would be. 

I still used it all. After all, I’m not going to waste these ingredients, making my skin very soft!

This recipe was my next attempt, and it turned out amazing. This homemade body cream is light, and the blend of essential oils (Frankincense, Palmarosa, and Ylang Ylang) adds a nice floral touch. 

homemade olive oil body cream with ylang ylang, palmarosa and frankincense

The body cream also melts into your skin and doesn’t leave a greasy feeling as other oil-based butters tend to do. 

Let’s get started!

This post contains affiliate links. If you use these links to buy something I may earn a commission. Thanks!

Why Make a Homemade Body Cream? 

Our skin is our largest organ, and it is important to treat it right. It’s are the biggest defense against the outside elements, after all. A lot of store-bought body creams and butter have questionable ingredients and chemical preservatives. 

With a DIY body cream, you control the ingredients. You can customize it for your specific skin concerns. Plus, it’s fun to use the skincare products you made yourself!

Homemade body cream also is cost-effective. After the initial investment in the oils and butters, you’ll only use a little bit for each jar, so over time, you’ll save quite a bit of money. And who doesn’t like to save money? 

Benefits of Olive Oil Body Cream

This body cream is made with nontoxic ingredients that are highly moisturizing. Take a look at these powerhouse ingredients. 

Beeswax: 

beeswax pellets, yellow

Beeswax is a natural wax produced by honey bees. It is edible and non-toxic, thus making it a great ingredient for skincare and clean beauty products. 

This wax is great at creating a protective layer and trapping moisture as it’s a humectant. This combination makes beeswax a perfect ingredient in lip balm recipes. 

Shea butter:

shea butter

Shea butter is a fat derived from nuts. It comes from the African Shea tree. This butter is a very popular ingredient in body butters as it’s incredibly nourishing. 

It is very thick and can be greasy if used on its own. When combined with other butters and oils, it provides incredible moisturizing properties. Shea butter is also edible and non-toxic. 

And, even though this butter comes from a nut, it has a  low chance of triggering nut allergies

Coconut Oil: 

coconut oil

Coconut oil is one of the most popular ingredients in DIY beauty recipes. This oil provides so many great benefits for our skin. It protects skin from environmental damage, hydrates, and can minimize fine lines and wrinkles. 

Also, because it absorbs easily, it won’t leave a greasy feeling on your skin. Coconut oil does have a high comedogenic rating (4). I use fractionated coconut oil which has a comedogenic rating of 2. 

Sweet Almond Oil: 

Sweet almond oil is such a powerhouse. It not only is great at moisturizing, but it also can lighten dark spots. Over time, our lips can lose their vibrant pink color, and this oil helps even the tone. 

Vitamin E Oil: 

Vitamin E is a popular anti-aging gold mine. It’s no wonder it’s used in many skincare products. This oil is thicker than others, and you only need a little bit to get the job done. Vitamin E oil is perfect for dry and chapped lips as it encourages cell turnover and leads to the skin regenerating faster. 

Frankincense: 

Frankincense Serrata essential oil bottle, Plant Therapy

Known as the king of oils for its vast benefits, Frankincense essential oil has been used for centuries. It’s even biblical! Frankincense is an aromatic resin that comes from the tree Boswellia. This liquid gold can improve skin tone and elasticity which is great if you’re looking for antiaging elements. 

Palmarosa: 

Young Living Palmarosa Essential Oil bottle, DIY Body Cream Recipe

Palmarosa essential oil comes from a grass native to India and Indochina. This light, floral oil can stimulate and rejuvenate the skin to look healthy and toned. It is also very moisturizing. 

Ylang Ylang: 

Young Living Ylang Ylang Essential Oil bottle, homemade body butter recipe

Ylang Ylang comes from the Cananga tree, which is native throughout South Asia, such as India, Malaysia, and the Philippines. This lovely oil has a scent that can lift your mood and calm anxiety—the perfect combo for a morning or night cream. 

How to Make Homemade Olive Oil Body Cream

Whipped Homemade Olive Olive Body Cream Recipe with Shea Butter and Essential oils

Ingredients

1/4 c Olive Oil

4 tbsp Shea Butter

1 tbsp Coconut Oil

1 tsp Sweet Almond Oil

1 tsp Vitamin E oil

2 tbsp + 1 tsp Beeswax Pellets

15-20 drops essential oil (I used Frankincense, Palmarosa, Ylang Ylang)

Mason Jar or Small Container

Double Boiler

Stand Mixer


Notes: 

  • This recipe fills a small 2 oz container.

Directions: 

  1. In a double boiler, melt shea butter, beeswax pellets, and oils (except essential oils if using) over low heat. 
  2. Remove from heat and add essential oils. 
  3. Chill in the fridge from 45 minutes to 1 hour. 
  4. Transfer mixture to a mixer. On the high setting, whip until smooth. 
  5. Transfer to a mason jar or small container. 

How to Use Your Whipped Body Butter

This nourishing homemade olive oil body cream is perfect to use right after a shower. Tap away excess water with a towel and apply your body cream. A little goes a long way, so you won’t have to lather it on. Also, since this is an oil-based cream, let it absorb before putting it on. I usually put a robe on while I”m getting ready, and I’m ready to put on clothes within 5-10 minutes. The cream does absorb and won’t leave a greasy feeling. However, keep in mind it is an oil-based cream. 

This homemade cream is also perfect to put on at night before bed. I like to put it on twice a day for extra moisturizing properties. I always wake up with super soft skin! And, with regular use, your skin won’t be dry and ashy anymore. 

Storing Your Homemade Body Cream

Since this cream is free of preservatives, use it regularly. For me, a 2 oz container lasts about 3-4 weeks. I love this aspect as I can whip up a batch every month and change essential oils as I like. I love to experiment with scents depending on the seasons. 

The vitamin E oil in this cream will help prevent mold. Try to avoid contamination by keeping cream away from water. You can store the cream in the bathroom. I keep mine right on the countertop, so it’s ready for use every day!

I hope you enjoy this recipe for homemade olive oil body cream! If you make it, please comment below and share any photos on social media – @by.bindi (Instagram). 

Want more DIY recipes? Try this Lavender Vanilla Lip Balm Recipe that is completely non-toxic and nourishing. 

Posted on 5 Comments

Easy Personalized Bachelorette Water Bottles With Cricut

personalized vinyl water bottles

Have you seen all those cute personalized bachelorette water bottles on Pinterest and Etsy? They are so adorable! They also can be pretty pricey. If you’re on a budget for your wedding and like to DIY items, this easy Cricut tutorial is for you! You’ll learn how to make vinyl decals, transfer them and create super adorable bottles and tumblers for your bach!

I am planning my sister’s bachelorette, and I wanted to create adorable water bottles that we can use by the pool and such. I love to DIY my projects and thought; let’s try making it myself. I’m so glad I did because the result was a fraction of the cost, and I didn’t sacrifice quality at all! Each bottle comes out to less than $3.00 each. 

All the other bridesmaids loved the bottles too. 

This post contains affiliate links. If you use these links to buy something I may earn a commission. Thanks!

Easy Personalized Bachelorette Water Bottles  (Tutorial)

Materials: 

Permanent Vinyl ( I used this Rose Gold Vinyl)*

Cricut

Light Grip Mat

Weeding Tool

Water Bottle** (I chose clear for my project)

transfer tape


Notes: 

*This vinyl comes with a protective clear sheet. Remove this before you place the vinyl on the circuit mat. 

**This tutorial works with water bottles and tumblers. If you’re using a different bottle than the one I used, you can use a measuring tape to figure out your decal size. 

Instructions

There are 4 steps to making your personalized bachelorette water bottles.

  1. Create your text/cut file in Cricut Design Space. 
  2. Cut your vinyl decal with Cricut
  3. Apply transfer tape to your decal
  4. Apply decal to your water bottle. 

Here are detailed instructions for each step.

How to Make Vinyl Decals with Cricut

For my bottles, I decided to use Metallic Rose Gold Vinyl. I absolutely love how shiny and glossy this vinyl is, and it comes out so pretty and elegant. It’s gorgeous, and I can’t stop looking at it!

To make your personalized bachelorette bottles, you’ll start by making your decal with your Cricut. 

Choosing a Decal Size

There are two ways to make decals: 

  1. Use the same width for your size. 
  2. Use the same font. 

When you use the same width, longer names will appear smaller and shorter names will be bigger. With this option, decals will have different heights. 

With option #2, your decals will be cohesive. For my project, I decided to go with option 2 because I am placing my decals vertically and wanted the same height for them. 

Instructions

  1. Open up  Cricut Design Space.  Choose a new project.Cricut Design Space New Project Screen
  2. Select Text from the panel on the left. how to add text in cricut design space
  3. Type your desired name into the text box. For this example, we are using “Vanessa. “Typing Name into Text box in Cricut Design Space
  4. Change your font to 72 pt and Christmas Farmhouse. 
    1. Christmas Farmhouse is a licensed font. I got mine from Creative Fabrica membership. Creative Fabrica is a wonderful website to get fonts. If you don’t want to pay for the membership, you can look for a font that is available for personal use or use a font that is already in your system. Cricut Design Space Text
  5. Highlight and Ungroup your text (This will let you move each letter around). Ungrouping text in Cricut Design Space
  6. Move the letters to attach them so that the name is cohesive. You can skip this step if you are okay with the spaces between the letters. I wanted my writing to be script. text in cricut design space
  7. Select your text and weld (bottom right-hand corner). This puts your text back together as one piece. weld text in cricut design space
  8. Change the color to match the vinyl color. For this project, I chose a rose gold color. change color in cricut design space
  9. Select Make it from the upper left-hand corner. make it in cricut design space
  10. Change the size to match your vinyl. I used 12 x 12. Once the proper size is selected, hit continue from the bottom left corner. change material size in cricut design space
  11. Change the dial on your Cricut to Vinyl. 
  12. Remove clear protective covering from your vinyl—place vinyl on a light grip mat. 
  13. Load your light grip mat into the Cricut by aligning your mat and hitting the arrow button.
  14. Select Make It on your Computer and the flashing C on your Cricut. 
  15. At this point, your Cricut will cut the name. When finished, unload by hitting the arrow button. 

How to Weed Your Vinyl Decal

Using your weeder, carefully lift the edges of the vinyl up. Use the weeder to help peel away the excess material. 

weeding vinyl


How to Transfer Your Decals 

Now that you have your decal weeded, you’ll prep it for transfer to the water bottles. Cut the same size transfer tape as your decal. Carefully remove the carrier paper backing from the clear transfer tape. Take the transfer tape and place it directly on top of your decal. You can now move onto applying your personalized decal to the water bottle.

vinyl and transfer tape

vinyl with transfer tape

Vinyl Application Instructions: 

  1. Clean the application surface area with alcohol or soap & water. Dry thoroughly.water bottle with personalized vinyl name
  2. Using a squeegee/scraper or credit card, press firmly on the back of the decal to ensure that the decal sticks to the application transfer paper (clear tape).
  3. Peel the paper backing away from the decal very slowly. If the decal is still on the carrier paper, use the credit card again to firmly rub until the decal lifts on to transfer the paper completely. Go slow and press firmly from all directions. 
  4. Apply decal to cleaned and dry area, pressing firmly using squeegee or credit card to adhere decal to application surface. Be sure to go slowly to avoid any bubbles. It’s best to start pressing from the center outward. 

personalized vinyl water bottles

Notes: 

  • This vinyl is permanent. 
  • Handwash surface only. Decals are NOT microwave or dishwasher safe.

Tips and Tricks

How to Avoid Air Bubbles On Your Vinyl

Sometimes you will see air bubbles pop up when you transfer your vinyl. Here are ways to get a smooth transfer. 

I hope you enjoyed this tutorial for personalized bachelorette water bottles tutorial. If you make these bottles, I’d love to see your creations. Tag me on Instagram @by.bindi. 

Want more Cricut tutorials for bachelorette favors? Try making these confetti hearts to add to your favor bags or bridesmaid proposal boxes. Subscribe to my weekly newsletter to stay updated on the latest blog posts. 

Looking for cute ready-made wedding favors?